
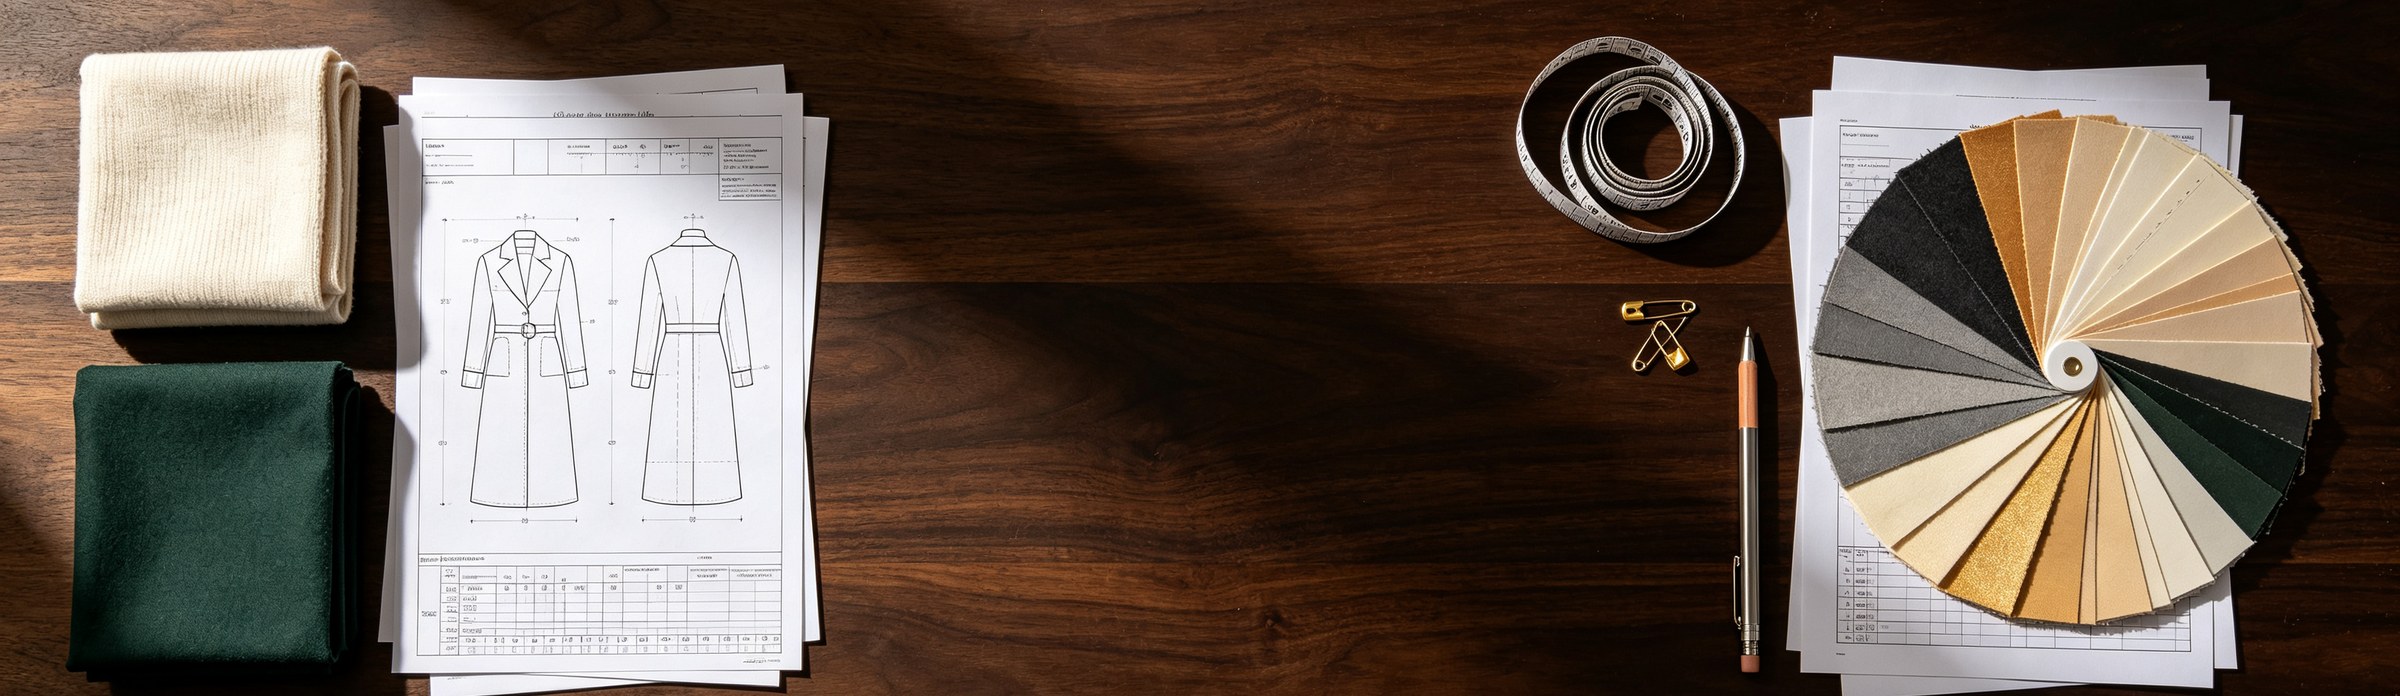
A clothing tech pack is the document that turns a design into instructions a factory can actually cut, sew and inspect from — the flat sketch, the materials, the measurements with tolerances, the construction detail, and the standard the finished goods get checked against. We’re Renrui Textile, a garment factory in Suzhou, China, and this is how work arrives at our door: most weeks at least one tech pack lands that is beautifully designed and still cannot be sewn from — not because the designer did anything wrong, but because it was written for a person, and it is going to be read by a cutting room on the other side of the world.
There is already good material on the internet about what a tech pack is. Almost none of it is written by the people who have to build from one. So this is the other half of the conversation: what a factory actually reads, which fields decide your price, which blank cell quietly hands us a decision that should have been yours — and what gets lost in the gap between your document and a production line that does not share your language, your units, or your assumptions.
There is a free template at the bottom — no email required, no form — and if you fill it in, we will check it free before you commit to a sample. It is the same structure we ask our own clients for.
What a Clothing Tech Pack Actually Is
A tech pack (technical package) is the specification document that turns a design into a manufacturing instruction. It travels with your style through sampling, costing, production and inspection, and it is the reference everyone argues from when something goes wrong.
The definition that matters more, though, is a functional one. A tech pack is the complete set of decisions about your garment. Every decision it does not contain still gets made — it just gets made by someone in the factory, quickly, based on what is normal for them rather than what was in your head.
Which is why the most useful way to build a tech pack is not “what does my design look like” but “what could a stranger get wrong”. A factory quoting your style is reading for three things, in this order: can we source this, can we sew this at the rate we quoted, and what will we be measured against when the goods are inspected. Anything that answers those three questions belongs in the document. Anything that does not is decoration.
Why a Factory-Reviewed Template Beats a Template Site
Most tech pack templates online come from software companies or content sites — nobody who actually cuts and sews the garment reads them before you send them to a factory. This one does, because we are the factory. Fill it in, send it back, and we will flag anything a production line would misread — free, before you commit to a sample.
If you used an AI tool to generate your tech pack, send it to us first. We have seen what a factory does with the gaps AI-generated specs tend to leave — an empty tolerance column, adjectives in place of construction terms — and it is not cheap to find that out on a sample run instead of a spreadsheet.
The Eight Sections — and How a Factory Reads Each One
1. Cover sheet
Style name, style number, version number, date, category, size range, quantity, target dates. It looks like admin. It is actually version control, and it is the cheapest insurance in the document.
Here is the failure it prevents. You send a tech pack. Two weeks later you change the sleeve length in an email. Three weeks later you change the fabric weight in a WhatsApp message. The factory now holds three versions of the truth, and the pattern room is working from whichever one got printed. Bump the version number every single time anything changes, and re-send the whole document. A file called final_v2_REAL.xlsx is how the wrong spec gets cut.
One field on the cover sheet matters more than all the others: the unit of measure. Declare centimetres or inches once, at the top, and never mix them anywhere else in the pack. More on why below.
2. Flat sketch and callouts
Front view, back view, and detail views for anything that is not obvious — collar, cuff, pocket, hem, closure, artwork placement. Not a fashion illustration: a flat, technical, proportional drawing.
The part people skip is numbering. Number every callout on the sketch — 1, 2, 3 — and then use those same numbers in your bill of materials and your construction sheet. That numbering is what lets a pattern maker connect a line on a drawing to a stitch on a machine. Without it, someone in the factory is matching your paragraph of text to your picture by guesswork, and they will do it at speed.
3. Bill of materials (BOM)
Every material in the garment: body fabric, rib, thread, interlining, labels, hangtag, drawcord, zips, polybag.
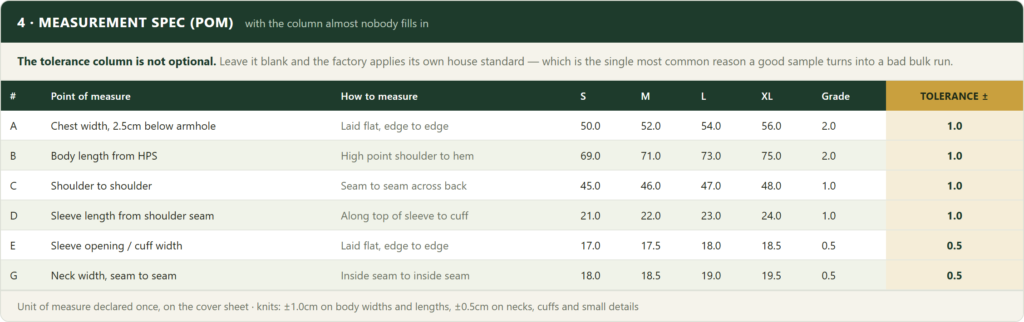
And this is where the single most common quoting problem lives. A BOM that says “cotton jersey” is not a specification. It cannot be quoted, it cannot be dyed, and it cannot be knitted. Four fields turn a fabric name into something a mill can actually book:
- Composition — 100% combed cotton, or 95/5 cotton-elastane. The 5% changes the machine, the price and the recovery.
- Weight (GSM) — 180gsm reads as a summer tee, 240gsm reads as a structured piece, 400gsm is a heavyweight hoodie. This is the number that most directly moves your unit cost.
- Yarn count — 30/1 versus 20/1 is the difference between a fine hand and a coarse one at the same weight.
- Finish — bio-wash, enzyme, peached, brushed. This is the “feel” you have in your head, and it is a process, not an adjective.
Give a factory those four and you get a real quote in a day. Give it “soft premium cotton” and you get either a long email or, worse, a confident number that quietly assumes the cheapest interpretation.
4. Measurement spec (POM) — the one with the tolerance column
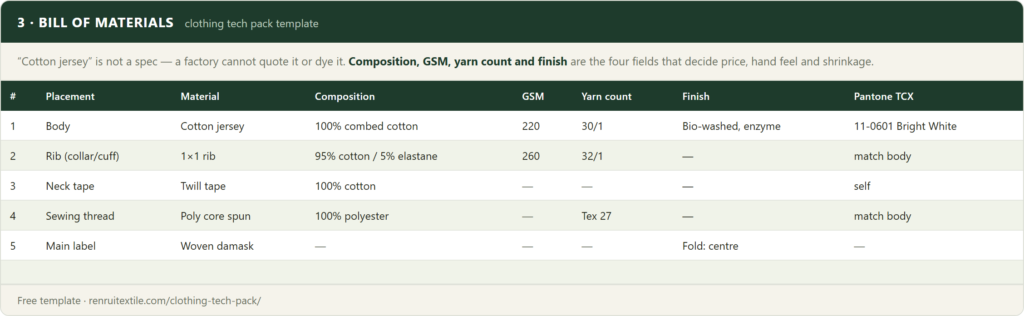
A points-of-measure sheet lists every dimension of the garment, in every size, with a description of how each one is measured. Chest width 2.5cm below the armhole, laid flat. Body length from HPS (high point shoulder). Sleeve opening, edge to edge.
The description matters as much as the number, because “chest” has at least three plausible meanings and only one of them is yours.
But the column almost nobody fills in — and the reason this section gets its own warning — is tolerance. See below; it is the biggest single point of failure in this document.
5. Construction and stitching
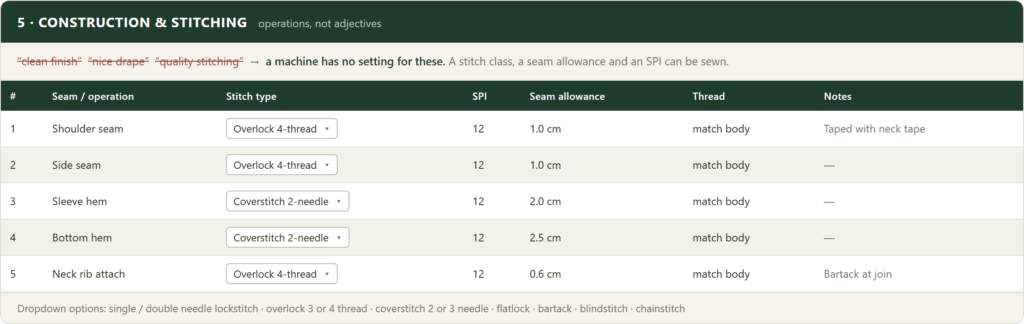
How each seam is joined. Stitch class, seam allowance, stitches per inch, thread, and any reinforcement.
“Clean finish”, “quality stitching” and “nice drape” cannot be sewn. A machine operator does not have a setting for them. What can be sewn: overlock 4-thread, 12 SPI, 1.0cm seam allowance, bartack at the join. If you do not know the stitch names, that is completely fine — send a reference garment and ask the factory to spec it back to you. Any real factory will, and their answer becomes the sheet.
6. Colourways
One row per colour, with Pantone references. Use TCX (the textile cotton library), not TPX or coated chips — those are for print and they will be matched wrong on fabric.
Worth knowing before you plan your colour range: fabric dyed to your colour needs its own dye run, so minimums are counted per colour, not per style. That is why a four-colour range is four times the minimum, not one — and why a first order is almost always cheapest as a single colourway with the full size range inside it. Settle the colour count before you finalise the colourway page; it moves your first order more than any other line in the pack.
7. Labels, trims and packaging
Main label, care label, size label, hangtag, polybag, barcode. Material, size in millimetres, exact placement, and the artwork file.
This is the most-skipped sheet in the entire document, and it is the one that holds a finished order at the door. Fibre content and care symbols are legally required in most markets; the factory prints exactly what you write here and nothing more. Discovering at inspection that your care label is missing a country of origin means re-labelling every unit by hand.
One practical note: woven labels have their own minimum, because the loom has a fixed setup cost — typically 100 per colour. Printed labels go lower. If you are running 100 pieces, that is a real constraint on your first order, and it is better to know it now than after you have designed a woven label.
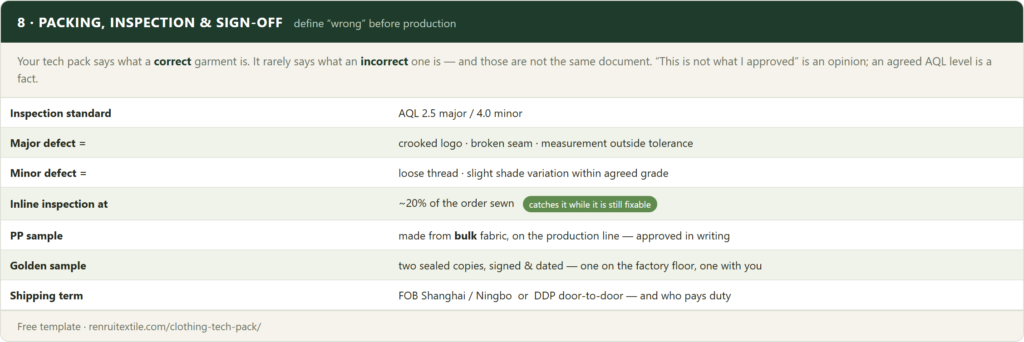
8. Packing, inspection and sign-off
Folding, pieces per polybag, assortment, carton counts, carton markings — and your inspection standard.
Write the inspection standard into the tech pack, not into an argument after the goods land. Most garment inspection runs on AQL (Acceptable Quality Limit), and the operative word is acceptable: a lot passes with a defined number of defects in it. That is not a loophole, it is how the whole supply chain works — but “passed inspection” does not mean “zero flawed units”, it means the flawed units fell below an agreed threshold.
So agree the threshold. What AQL level, and what counts as a major defect versus a minor one. A loose thread is a minor. A crooked logo is a major. Where that line sits is negotiable, and it belongs in this document, in writing, before production.
What Gets Lost Between Your Tech Pack and an Overseas Factory
Everything above is true for any factory anywhere. This next part is the half that the guides written by design studios do not cover, because they have never had to read a tech pack through a language barrier at eight in the morning with a line waiting.
1. Tolerance — the blank column that decides your bulk run
This is the most expensive empty cell in apparel.
A tolerance is the amount a finished garment is allowed to deviate from your spec and still be correct. Chest width 52cm, tolerance ±1.0cm, means anything from 51 to 53 passes. Fabric relaxes, panels are cut from an 80-layer stack, humidity moves knits — a garment is not a machined part, and some deviation is physics, not negligence.
If you leave the tolerance column blank, the factory applies its own house standard. Not maliciously — it simply has to apply something, and it will apply what is normal for its usual customers. If its usual customers are ordering basic tees at volume, “normal” may be looser than what your fitted style can survive. Then the sample comes back perfect, the bulk comes back drifting, and there is no document that says anyone was wrong.
As a starting point for knits: ±1.0cm on body widths and lengths, ±0.5cm on necks, cuffs and small details. Tighten it where the fit actually depends on it and loosen it where it does not, because tolerance costs money — a tighter tolerance means more rejected panels and slower sewing, and a factory that is quietly holding ±0.3cm across every point of measure is either charging you for it or not doing it.
2. Units — and the mixed-unit tech pack
Designers in the US and UK think in inches. Cutting rooms in China work in centimetres. Both of those are fine, and neither causes a problem on its own.
What causes a problem is a tech pack that uses both — inches on the measurement sheet because that is how the designer thinks, millimetres on the label sheet because that is how the label supplier quotes, and a seam allowance in centimetres because it was copied from a reference document. Every conversion is a chance for a rounding error, and rounding errors compound across a graded size range.
Declare one unit on the cover sheet. Use it everywhere. If you are more comfortable in inches, work in inches — a Chinese factory converts inches every day without difficulty. It is the mixing that hurts.
3. Adjectives do not survive translation
“Clean finish.” “Premium feel.” “Nice drape.” “Not too boxy.”
These are perfectly clear to another native speaker who has held the garment you are imagining. They are close to meaningless by the time they reach a production line — and the honest thing to understand is that they get resolved anyway, silently, by whoever is standing at the machine, according to what “clean” usually means in that building.
The fix is not better English. The fix is replacing adjectives with operations. “Clean finish at the hem” becomes “coverstitch, 2-needle, 2.5cm hem allowance, 12 SPI”. “Premium feel” becomes “220gsm, 30/1 combed, bio-washed”. “Not too boxy” becomes a number in the chest and a number at the hem. Every adjective you convert into a specification is a decision you take back.
4. The reference garment beats the document
If you own a garment whose fit, weight or hand you want to get close to — send it. Physically. It will teach a factory more in ten minutes than forty pages will.
A pattern maker can measure it, feel the fabric, look at how the seams were built, and reverse-engineer a spec that is closer to what you want than your document was, because the garment does not have to survive translation. Measurements travel badly across languages. A physical garment does not travel at all — it just arrives.
This is the single most useful thing a first-time brand can do, and it is free apart from the courier. Send the reference, and mark clearly what you want to keep from it and what you want to change. “This fit, this weight, but 3cm longer in the body and a heavier rib” is a brief a factory can act on immediately.
5. Nobody wrote down what “wrong” means
The last thing that gets lost is the definition of failure.
Your tech pack says what a correct garment is. It very rarely says what an incorrect one is, and those are not the same document. Without an agreed AQL level, an agreed major/minor split and an agreed tolerance, “this is not what I approved” is an opinion — and an opinion loses to an invoice every time.
The three checkpoints worth writing into the pack, in order of how much they save you:
- A PP (pre-production) sample made from bulk fabric, on the production line, approved by you in writing. Your development sample was made by the best tailor in the building, by hand, from whatever roll was around. Your bulk is a different process and often a different dye lot. The PP sample is where you find that out — not after 500 pieces are sewn.
- A golden sample. Two identical copies of the approved sample, signed, dated, sealed. One stays on the factory floor, one stays with you. It converts a future argument from an opinion into a physical fact sitting on the QC table.
- An inline inspection at roughly 20% sewn. Everyone books a final inspection. Very few small brands book an inline one — and inline is the one that saves you, because a systemic error caught at 20% has happened a hundred times and is fixable, while the same error at final inspection has happened five hundred times and your only options are all bad.
Before You Send It: Protecting the Design
There is a question underneath this entire article that most people do not ask out loud, so let us ask it directly: you are about to email your complete product design to a factory you have never met, in a country you have never visited. What stops them from simply making it for someone else?
It is a fair fear and it deserves a real answer rather than reassurance. Three things, and all three should be in writing before you attach a single file:
- An NDA, signed before you send anything. Not after the quote, not with the deposit. Before the files move. A factory that will not sign one before seeing your design has told you something useful for free.
- A no-resale clause in the production contract. This is the one people forget, and it does more work than the NDA. It states plainly that your design, your patterns and your samples are not resold, not listed in the factory’s own catalogue, and not produced for anyone else. An NDA covers secrecy; the no-resale clause covers what happens after your product exists.
- Ownership of the patterns and the tech pack. Your patterns are yours. If you leave, they leave with you. A factory that treats the pattern it graded from your tech pack as its own property has quietly locked you in, and you will discover it on the day you try to move.
We put all three in writing, because private label buyers ask us this question more than any other, and “trust us” is not an answer.
What Happens After You Press Send
For context, so the timeline in your head is roughly the timeline in ours. This is how it runs at our factory; other factories will differ, but the shape is fairly standard.
Quoting. A complete tech pack gets quoted quickly, because there is nothing to ask about. An incomplete one turns into a round of questions first, and that round is usually where a week goes.
Sampling. Sample in 7–10 days. The sample fee is credited back against the bulk order when you place it, which is worth knowing when you compare against a factory offering a “free sample” — free samples are made to look good, and paid samples are made to be correct.
Bulk. A first order runs roughly 18–26 days once the sample is approved. A repeat order, where the tooling and the spec already exist and nothing needs re-sampling, ships in 10–15 days.
Minimums. 100 pieces per colour on fabric dyed to your colour, because each colour needs its own dye run. Sizes are mixed freely inside those 100 — XS to XXL in one go, with no size multiplier, which is where a lot of factories quietly add one. Working from certified stock fabric we can run 100 pieces split across several colours, which is usually the only realistic path for a genuine first order.
Quality. Inspection at AQL 2.5, and if bulk deviates from the sample you approved, we remake it. Our materials certificates are public and verifiable rather than a logo on a page — OEKO-TEX® Standard 100 SH025 206558 (issued by TESTEX) and GRS 4.0 TE-00110085 (issued by Intertek); take the numbers and check them in the certifier’s own database, which is what you should do with any factory’s certificates. That is a stronger commitment than a defect rate, and it is the one that matters, because “consistent with the sample” is what you were actually promised.
Landed cost. If you are importing to the US, ask for the duty to be written into the quote as its own line — the 12% MFN base plus whatever the current Section 301 rate is on the day. Any factory that will not put the tariff in writing is leaving you to discover it at customs. Door-to-door DDP, with duty included in a single landed price, is worth asking about on a first import.
Whether you work with us or not, those are the questions. A factory’s answers to them will tell you more than its website will.
The Clothing Tech Pack Template
The same eight-sheet structure we ask our own clients for: cover sheet, flat sketch, bill of materials, measurement spec with a tolerance column, construction sheet with stitch-type dropdowns, colourways, labels and packaging, and packing and inspection. Free to use, edit and share. No attribution needed, no form to fill in.
Download the Excel template Download the printable PDF
Want it checked? Send us the filled tech pack and we will review it free of charge, flag anything a factory would read differently from how you meant it, and quote it. We sign an NDA before you send anything.
FAQ: Clothing Tech Packs
A tech pack is the specification document that turns a garment design into a manufacturing instruction. It contains the flat sketch, the bill of materials, the measurement spec with tolerances, the construction and stitching detail, the colourways, the label and packaging detail, and the inspection standard. Functionally, it is the complete set of decisions about your garment — and every decision it leaves out still gets made, just by the factory rather than by you.
Start with the cover sheet and declare one unit of measure. Draw flat front, back and detail views, and number every callout. List every material with composition, GSM, yarn count and finish. Build a measurement sheet with a description of how each point is measured and a tolerance for each one. Write construction as stitch types, seam allowances and SPI rather than adjectives. Then add colourways, labels and packaging, and your inspection standard. You do not need design software — a spreadsheet is genuinely enough, and there is a free template above.
Not to start a conversation, but you need one to get a quote you can rely on. A factory quoting without a tech pack is quoting its own assumptions — usually the cheapest reasonable interpretation of what you described — and that number will move once the real spec appears. If you do not have a tech pack yet, send a reference garment and a target price instead; that is a far better starting point than a description.
A tolerance is how far a finished garment may deviate from your spec and still be correct — for example, chest width 52cm ±1.0cm. It matters because if you leave it blank, the factory applies its own house standard rather than yours. That is the most common reason a sample looks perfect and the bulk run does not. A useful starting point for knits is ±1.0cm on body widths and lengths and ±0.5cm on necks, cuffs and small details.
Yes, and it is often the better first move. A pattern maker can measure a physical garment, feel the fabric and read the construction directly, which is more reliable than a document that has to cross a language barrier. Send the garment, say clearly what you want to keep and what you want to change, and ask the factory to spec it back to you — their spec sheet then becomes the basis of your tech pack.
Freelance tech pack services typically charge somewhere in the low hundreds of dollars per style, and specialist studios charge more. You can also build one yourself in a spreadsheet — for a simple knit style that is entirely realistic, and the template above is designed for exactly that. The cost that actually matters is not the tech pack; it is the extra sampling rounds and the bad bulk run that an incomplete one buys you.
It is the right question to ask, and the answer should be contractual rather than reassuring. Ask for three things in writing before you send any files: an NDA signed before the files move, a no-resale clause in the production contract covering your design, patterns and samples, and confirmation that the patterns and tech pack remain your property so they leave with you if you move factory. A factory that will not put those in writing has answered your question.
No. If you do not know stitch names or construction terms, describe what you want in plain language and send a reference garment if you have one — a real factory will spec it back to you in the terms a production line needs, and that becomes the construction sheet. The template above is built for someone filling it out for the first time, not for a pattern maker.
For a straightforward style, a few hours once you have your measurements and materials decided — most of that time goes into the bill of materials and the tolerance column, not the sketch. A first-timer usually spends longer deciding what to specify than typing it in, which is exactly why the free review exists: send it back and we will tell you what is missing before you find out from a bad sample.
Where to Go From Here
If you have a filled tech pack — or a reference garment and a rough quantity — the fastest next step is a quote conversation. It costs nothing, it settles fabric, price tier and timeline in one exchange, and how a factory answers the questions in this article will tell you more about it than any brochure.
Renrui Textile manufactures knitwear and home textiles from our own factory in Suzhou, and we work with brands from 100 pieces up, which means most of the people who send us a tech pack are sending their first one. If that is you, the categories we run most often are small-batch apparel production, hoodies and heavyweight fleece, women’s knitwear, cut-and-sew streetwear and sleepwear and loungewear.
✅ Free tech pack review — send it, we flag what a factory would read differently
✅ NDA before you send files — plus a no-resale clause and pattern ownership in writing
✅ From 100 pcs per colour — sizes mixed freely inside that 100, no size multiplier
✅ Sample in 7–10 days — sample fee credited against your bulk order
✅ AQL 2.5 — bulk that deviates from your approved sample is remade
⏱️ We reply to every inquiry within 8–12 hours. [email protected] · WhatsApp +86 133 7216 9755
Pingback: How to Start a Swimwear Line: Real Numbers, No Signup
Pingback: How to Start a Streetwear Brand: Real OEM Costs