Category Archives: Blog

How to Start a Streetwear Brand: The Cost Nobody Publishes for Overseas Production

Garment factory production line sewing streetwear hoodies, fabric rolls in deep green and cream on wooden shelving

A US cut-and-sew shop will quote you $18–50 for a tee or hoodie, $150–400 for a sample, and an 8–14 week turnaround — real numbers, easy enough to find. What’s much harder to find is the equivalent number for the path most streetwear brands actually end up on once their first 50-unit test run sells out: overseas OEM production. That number isn’t hidden because it’s bad. It’s hidden because most places publishing it want a sales call before they’ll say it out loud. We’re a cut-and-sew factory in Suzhou, Jiangsu, running that path — here it is without the call.

There are two manufacturing paths for a first streetwear order, and most content written about “starting a streetwear brand” doesn’t say which one it’s actually quoting. Everything below is for our path — overseas OEM — laid out so you can weigh it against whatever a domestic quote just handed you.

Two manufacturing paths, two cost structures — pick before you ask anyone for a quote

Domestic US cut-and-sew gets you a 8–14 week production window and easy in-person quality checks, at $18–50 per tee or hoodie plus $150–400 per sample. That’s the right call if speed-to-market matters more than margin, or your first run is small enough that per-unit cost barely moves your total spend.

Overseas OEM production trades a longer pipeline (add 2–3 weeks of shipping) for per-unit costs that are typically 5–15x lower at the same quality tier — which is what makes a $65 hoodie retail price actually profitable at streetwear volumes. Below are the real numbers for that path, not a “contact us for pricing” placeholder.

Step 1: A tech pack, before your first supplier email

Streetwear lives or dies on fit and hand-feel — a hoodie that feels thin kills a drop faster than a weak design does. Your tech pack needs graded spec measurements, fabric weight target, wash/shrinkage tolerance, and construction notes (raglan vs. set-in sleeve, ribbing vs. binding at cuffs). We cover what a complete tech pack needs to contain, and why incomplete ones get quoted wrong, in our clothing tech pack guide — send that alongside your first quote request, not after your first sample comes back wrong.

Step 2: The GSM number decides more than the design does

“Heavyweight” isn’t a spec. Here’s what heavyweight actually means in grams per square meter, and what we run:

Garment GSM range Fabric
Boxy / heavy tee 220–280 GSM Combed cotton
Heavy hoodie 400–500 GSM French terry or brushed fleece

Fabric is pre-shrunk to a ≤3% shrinkage tolerance — ask any supplier for their shrinkage number specifically, because an unlisted tolerance is usually a tolerance nobody tested. Certification-wise, our fabric runs under OEKO-TEX Standard 100 (certificate SH025 206558) and Global Recycled Standard (4.0 TE-00110085) for recycled-content runs, with BSCI and ISO 9001 compliance at factory level. Ask for certificate numbers directly — a real certification is independently searchable, a claimed one isn’t.

Custom streetwear hoodie - quarter zip, olive

Custom streetwear hoodie - quarter zip, rust terracotta

Step 3: MOQ — per colorway, not per style

The domestic-manufacturing numbers floating around cite 50–150 units for a first run, 300–500 at a traditional factory. Neither tells you whether that’s per style or per colorway, and that distinction changes your real minimum spend by multiples the moment you want more than one colorway per drop.

Most overseas factories quote 500–1,000 pieces per style before they’ll even sample it. Ours is 100 pieces per colorway per design, sizes mixed freely inside that 100 — a 3-colorway hoodie drop is a 300-unit order, not negotiable down to 150 because it’s “one style.” Custom woven labels carry a separate 200-piece-per-colorway minimum. If 100/colorway is still above your first-drop budget, see our breakdown of how low-MOQ manufacturing actually works before you assume every factory’s minimum is negotiable the same way.

Step 4: What it actually costs, published

Garment Small batch (100 pcs/colorway) Bulk (500+ pcs)
Heavy tee $1.20–2.00 FOB $0.53–0.93 FOB
Crewneck sweatshirt $2.53–3.67 FOB $1.80–2.33 FOB
Heavy hoodie $3.20–4.33 FOB $1.73–2.33 FOB

Compare that to $18–50 per unit domestic — the gap is exactly why streetwear brands running real per-drop volume move to overseas OEM once validation is done. FOB means priced at the China port (Shanghai/Ningbo); freight, duties, and decoration (screen print, embroidery, foil, DTG) are separate line items. Payment is a 30/70 split — 30% starts production, 70% before shipment.

Step 5: The real timeline, in days

  1. Sampling: 7–10 days. Real proto samples sewn in-house, not a mockup render.
  2. Bulk production: 25–40 days after sample approval — longer than a tee-only order because hoodie construction (drawstrings, pouch pockets, ribbing) adds sewing steps.
  3. Reorders: 10–15 days, once your tech pack and approved sample are on file.
  4. Quote turnaround: 8–12 hours once you send specs.

That’s roughly 5–7 weeks sample-to-delivery on a first order — add 2–3 weeks ocean freight, or ask for air freight if the drop date is fixed.

Before you wire a deposit: verify the factory is real

Ask any manufacturer for three things before you commit: their business licence, their certification numbers (OEKO-TEX/GRS/BSCI — checkable in the issuers’ public databases in about two minutes), and a proto sample sewn on their own production line. A trading company can forward photos of someone else’s factory floor, but it cannot sew your proto sample in-house in 7–10 days. Ask what AQL standard they inspect against and what happens if a batch fails — ours does not ship if it fails AQL 2.5, it gets reworked or remade before it leaves the factory. Before we cut bulk fabric, your approved sample is logged as a written production standard — fabric weight in GSM, color reference, and construction details — so “basically the same” isn’t a judgment call after 300 units arrive; if the bulk run falls outside that documented tolerance, it gets remade, not shipped. We also work on 30/70 terms or full Alibaba Trade Assurance escrow, so your deposit stays protected until the goods exist and pass inspection.

What actually goes wrong on a first streetwear order

  • Ordering hoodie GSM based on how it looks in a product photo. A 320 GSM fleece photographs identically to a 480 GSM fleece. The difference shows up the first time a customer wears it in cold weather and messages you about it.
  • Treating MOQ as per-style when it’s per-colorway. Plan your colorway count against your real budget before you fall in love with a 4-colorway drop.
  • Skipping a wash-test sample. Pre-shrink tolerance only means something if you’ve actually washed the sample before approving bulk.
  • No written deviation policy. Get it in writing what happens if bulk fabric doesn’t match the approved sample — before you pay the 30% deposit, not after 300 hoodies arrive a shade off.

About Renrui Textile

Renrui Textile manufactures streetwear — heavy tees, crewnecks, and hoodies — from Suzhou, Jiangsu, with OEKO-TEX and GRS-certified fabric and BSCI/ISO 9001 factory compliance. Full FOB pricing, GSM specs, and terms are published on our streetwear clothing manufacturer page — no quote request required to see the numbers.

Streetwear Manufacturing FAQ

100 pieces per colorway per design is the standard garment MOQ, with sizes mixed freely inside that 100. Custom woven labels have a separate 200-piece-per-colorway minimum.

Overseas OEM FOB pricing runs $3.20–4.33 per heavy hoodie at small-batch volumes (100 pcs/colorway), dropping to $1.73–2.33 at 500+ pieces. Domestic US cut-and-sew typically runs $18–50 per unit for the same category.

400–500 GSM for a heavy hoodie in French terry or brushed fleece; 220–280 GSM for a boxy or heavy tee in combed cotton.

7–10 days for a proto sample, then 25–40 days for bulk production after sample approval. Reorders with an existing approved sample run 10–15 days.

Print-on-demand or a small domestic run (50–150 units) suits early validation with minimal upfront cost. Overseas OEM production becomes worth the longer lead time once you’re ordering enough per colorway that the 5–15x lower per-unit cost outweighs the extra 2–3 weeks of shipping.

Ask for their business licence, certificate numbers you can verify independently in the issuers’ public databases, and proof the proto sample is sewn on their own line rather than subcontracted. Confirm whether MOQ is counted per style or per colorway, what AQL standard they inspect against, and what payment terms or escrow options they offer.

Ask the factory to document your approved sample as a written production standard before bulk starts — GSM, color reference, construction notes, and acceptable tolerance in writing, not just a physical sample sitting on a shelf that someone eyeballs against the bulk later. We log this for every approved sample before cutting bulk fabric; if the finished bulk falls outside that documented tolerance, it’s remade at our cost, not shipped and argued about afterward.

Request a Streetwear Manufacturing Quote

Inner Page Contact Form

Why Request a Quote From Us

  • Low MOQ — from 100 pcs per colour / design
  • OEKO-TEX® Standard 100 & GRS 4.0 certified materials
  • Full OEM / ODM — your design, labels & packaging
  • Sample turnaround in 7–10 days
  • Free fabric swatch pack on request

What to Include in Your Inquiry

  • Styles & target quantity
  • Fabric / stretch preference
  • Custom logo & labeling needs
  • Target price & deadline

⏱️ We reply to every inquiry within 8–12 hours.

You can also reach us directly:
WhatsApp: +86 13372169755
E-mail: [email protected]

About the Author
Yang works in market analysis and product strategy at Renrui Textile — running industry research and competitor teardowns, publishing market insight reports, and translating buyer needs into product decisions. That same research process is what goes into the pricing, MOQ, and spec data published across this site.

How to Start a Swimwear Line: The Numbers Nobody Else Will Publish

Custom swimwear cut-and-sew workshop: green, navy and coral bikini sets laid on pattern pieces along a wide cutting table, with rows of industrial sewing and overlock machines and thread cones by the factory windows

Every “how to start a swimwear line” guide you’ll find this week was written by one of two people: a print-on-demand platform trying to move you onto their dropship plan, or a factory that will happily explain the seven steps to launching a brand — and then ask you to “contact us for a quote” the moment you get to fabric, MOQ, or price. We checked. Printful’s guide gives you a MOQ range and a market-size stat, then routes you to sign up for free. A swimwear factory’s own guide gives you a 100–500-unit MOQ range, a 4–6 week lead time, and not one dollar figure. A sourcing agency’s guide has twelve steps and a 90-day roadmap and doesn’t mention a single number you could plan a budget around.

We’re a factory. We manufacture bikinis, one-pieces, tankinis, and rash guards out of Suzhou, Jiangsu. Below is what those guides leave out — because we publish it on our own site anyway, and there’s no reason to hide it from you here.

Custom swimwear flatlay - triangle bikini set, single dye lot

Custom swimwear ghost mannequin - sculpted one-piece

Why the other guides stop where the real questions start

A print-on-demand platform’s business model depends on you never building factory relationships — every step in their guide leads back to “start for free” on their own tool. A factory’s marketing blog has the opposite incentive: give you just enough to sound credible, then convert the real numbers into a sales call, because a live conversation is where a vague “100–500 units” becomes whatever price closes the deal that week. A sourcing agency’s guide is written to sound comprehensive without being falsifiable — twelve steps you can’t fact-check against anything.

None of that is dishonest, exactly. It’s just incomplete in a way that costs you time. So here’s the version with the numbers left in.

Step 1: Decide if you actually need a bulk manufacturer

Before you read another word about fabric weights or MOQs — if you’re testing a design concept, don’t have $1,500–3,000 to commit to a first production run, or you’re not sure swimwear is even your category yet, print-on-demand is the right call, not bulk manufacturing. POD gets you a live product page in days with zero inventory risk. It also caps your margin at roughly half of what bulk production delivers, and drop-ship swimwear fabric quality is generally a step below what a dedicated swim-fabric mill produces.

Bulk OEM production makes sense once you’ve validated that people will actually buy — a capsule of 2–6 styles that sold through a soft launch, a waitlist with real deposits, or an existing audience you’re converting into a product line. If that’s where you are, the rest of this applies to you.

Step 2: Build a tech pack before you contact any factory

Every guide mentions a tech pack. Almost none show you why swimwear’s tech pack is different from a t-shirt’s. Swimwear fit is unforgiving — a 2mm error in an elastic casing measurement shows up as a visible pucker on stretched fabric, in a way that never shows on a woven shirt. Your tech pack needs, at minimum: flat sketches front and back, a graded size spec sheet, lining construction notes (full lining vs. gusset-only), seam type per panel (flatlock vs. overlock vs. bound), elastic width and stretch percentage at leg openings and waistband, and a hardware spec if there’s underwire or adjustable straps.

We wrote a full walkthrough of what a tech pack needs to contain and why factories reject incomplete ones — read the clothing tech pack guide before your first supplier call, not after your first rejected quote request.

Step 3: Pick a fabric — and ask for the number, not the adjective

“Premium stretch fabric” tells you nothing. Here’s what we actually run and why it matters:

Spec What we use Why it matters
Composition 82% nylon / 18% spandex, or 80% polyester / 20% spandex Nylon blends hold shape and color better against chlorine and sun; polyester blends cost less and resist chlorine degradation slightly better for pool-heavy use cases
Weight 190–220 GSM Below ~180 GSM, fabric goes sheer when wet — the single most common first-order complaint from new brands who chose fabric on look alone
Construction Warp-knit tricot, four-way stretch Four-way stretch (vs. two-way) is what lets a suit recover its shape after sitting wet against skin for hours

If a supplier can’t give you a GSM number and a stretch-direction spec on request, they’re quoting fabric they haven’t actually tested for swim use. Ours is certified under OEKO-TEX Standard 100 (certificate SH025 206558, tested by TESTEX Zurich) and, for recycled-content orders, Global Recycled Standard (certificate 4.0 TE-00110085, Intertek). Ask any manufacturer for their certificate numbers directly — a real certification always has one, and it’s independently searchable.

Step 4: Understand how MOQ actually gets counted

This is the step where vague guides cost you the most money. “MOQ: 100–500 units per style” sounds like a range you can plan around. It isn’t a real number until you know whether it’s counted per style or per colorway, and whether sizes have to be pre-allocated or can flex.

Most overseas factories quote 500–1,000 pieces per style before they’ll even sample it. Ours is 100 pieces per colorway, with sizes mixed freely within that 100 — you’re not locked into ordering 20 of each size in advance. Custom woven or printed labels have their own minimum, 200 pieces per colorway, separate from the garment MOQ. That distinction — per colorway, sizes flexible — is worth asking every manufacturer you talk to, because “per style” MOQ from a factory running 5 colorways means you’re actually committing to 500+ units on your first order, not the 100–500 the guide implied.

If your budget genuinely can’t support garment MOQ yet, that’s a real constraint worth planning around before you approach factories — see our breakdown of how low-MOQ manufacturing actually works across categories, including which corners get cut to hit very small runs.

Step 5: What it actually costs, by category

This is the table every guide we checked skipped entirely. FOB pricing, published, not quoted after a call:

Category Small batch (100–299 pcs) Bulk (1,000+ pcs)
Bikini / two-piece $3.00–4.50 FOB $1.85–2.75 FOB
One-piece $4.00–5.50 FOB $2.50–3.50 FOB
Rash guard / cover-up $2.50–3.80 FOB $1.60–2.30 FOB

FOB means the price at the China port (Shanghai or Ningbo) before your freight and duties — budget separately for that, or ask for DDP (door-to-door, duty paid) pricing if you’d rather have one landed number. Payment is typically 30% deposit to start production, 70% before the goods ship. Run your own numbers against these tiers before you talk to anyone — it’s already published, no quote request needed to see it.

Step 6: The timeline, in days, not "weeks"

  1. Sampling: 7–10 days. You approve a physical sample before anything goes to bulk. That approved sample becomes the production standard — if bulk drifts from it, the factory remakes it, you don’t debate it after the fact.
  2. Bulk production: 18–25 days after sample approval, for a standard first order.
  3. Reorders: 10–15 days, once a tech pack and approved sample already exist on file.
  4. Quote turnaround: 8–12 hours for an itemized quote once you send specs — if a supplier takes days to answer a spec question, that’s a preview of how production communication will go.

Compare that to “4–6 weeks” or a 90-day roadmap with no day-level breakdown — vague timelines are usually vague because nobody’s tracking them against a real production floor.

Step 7: Quality control isn't a step you skip

Swimwear fails in specific, predictable ways: chlorine-faded color after repeated wash cycles, lining separating from shell fabric at the seam, elastic losing recovery after stretching. Ask what quality standard your factory inspects against before shipment — AQL 2.5 is the acceptable-quality-limit standard we run pre-shipment inspection against, meaning a defined maximum defect rate per batch size before a shipment is rejected or reworked. If a factory can’t name their AQL standard, they don’t have a formal inspection process — they’re checking “does it look okay.” If a batch fails AQL 2.5 on pre-shipment inspection, it does not ship — it gets reworked or remade before it leaves the factory, not after it lands on your dock.

Before you wire a deposit: verify the factory is real

Ask any manufacturer for three things before you commit: their business licence, their certification numbers (OEKO-TEX/GRS — checkable in the issuers’ public databases in about two minutes), and a proto sample sewn on their own production line. A trading company can forward photos of someone else’s factory floor, but it cannot sew your proto sample in-house in 7–10 days. We also work on 30/70 terms or full Alibaba Trade Assurance escrow, so your deposit stays protected until the goods exist and pass inspection.

The mistakes that show up in every first swimwear order

  • Choosing fabric by photo, not GSM. Under ~180 GSM, most fabric goes sheer when wet. This is the single most common first-order return reason.
  • Ordering pre-allocated sizes instead of a mixed-size MOQ. Committing to fixed size breakdowns before you have any sell-through data means you’re guessing twice — once on style, once on size curve.
  • Skipping a wear-test sample round. A sample that looks right on a mannequin can still fail on a body in motion — one additional wear-test round before bulk catches most seam and elastic issues.
  • Not asking how bulk deviation from sample gets handled. Get this in writing before you pay a deposit, not after bulk arrives different from what you approved.

About Renrui Textile

Renrui Textile manufactures custom swimwear — bikinis, one-pieces, tankinis, and rash guards — from Suzhou, Jiangsu, with OEKO-TEX and GRS-certified fabric options. Full pricing and terms are published on our custom swimwear manufacturing page, including FOB tiers, MOQ mechanics, and OEM development process — no quote request required to see the numbers.

Custom Swimwear Manufacturing FAQ

100 pieces per colorway is the standard garment MOQ, with sizes mixed freely inside that 100. Custom labels have a separate 200-piece-per-colorway minimum.

7–10 days for a first sample, once your tech pack and fabric selection are confirmed.

FOB pricing runs $3.00–4.50 for a bikini and $4.00–5.50 for a one-piece at small-batch volumes (100–299 pcs), dropping to $1.85–2.75 and $2.50–3.50 respectively at 1,000+ pieces.

190–220 GSM is the standard weight range for opaque, wet-performance swim fabric. Below roughly 180 GSM, most fabrics go sheer when stretched and wet.

Print-on-demand suits early validation — no inventory risk, live in days — but caps margin and fabric quality. Bulk OEM production makes sense once you have evidence people will buy: a sold-through capsule, a paid waitlist, or an existing audience.

Ask for their business licence, certificate numbers you can verify independently in the issuers’ public databases, and proof the proto sample is sewn on their own line rather than subcontracted. Confirm whether MOQ is counted per style or per colorway, what AQL standard they inspect against, and what payment terms or escrow options they offer.

Request a Swimwear Manufacturing Quote

Inner Page Contact Form

Why Request a Quote From Us

  • Low MOQ — from 100 pcs per colour / design
  • OEKO-TEX® Standard 100 & GRS 4.0 certified materials
  • Full OEM / ODM — your design, labels & packaging
  • Sample turnaround in 7–10 days
  • Free fabric swatch pack on request

What to Include in Your Inquiry

  • Styles & target quantity
  • Fabric / stretch preference
  • Custom logo & labeling needs
  • Target price & deadline

⏱️ We reply to every inquiry within 8–12 hours.

You can also reach us directly:
WhatsApp: +86 13372169755
E-mail: [email protected]

About the Author
Yang works in market analysis and product strategy at Renrui Textile — running industry research and competitor teardowns, publishing market insight reports, and translating buyer needs into product decisions. That same research process is what goes into the pricing, MOQ, and spec data published across this site.

China Tariffs on Your Clothing Order: What Actually Lands on Your Invoice

Quick answer

China tariffs on clothing are two numbers stacked together — a base MFN rate (about 16.5% on a cotton hoodie, HS 6110.20.20) plus a separately-published Section 301 rate that changes without notice. We write both into every quote before you pay a deposit.

We are Renrui Textile, a garment factory in Suzhou city of China. So many buyer often sent the E-mail to talk with us about the import duties from China to the USA if they place the bulk order to us what the tariff on their order is going to be, and we’ve learned the honest answer is longer than they want it to be — because the real answer is two numbers stacked on top of each other, and one of them has moved more than once since we started writing quotes this year.

If you check with the freight forwarders and they only send a tidy percentage list but it seems to be useless for you. If you check with us, and you will get the number tied to your actual HS code and your actual production date — because we’re the ones who have to write it on your quote before you send a deposit, not the ones trying to get you to book a container.

The duty on a cotton hoodie isn't one number — it's two, stacked

When our customer forwarded us a quotation list from other supplier with a single line — “duty: 12%” — we knew exactly what had been left out. The base MFN rate on a cotton hoodie (HS 6110.20.20) is closer to 16.5%, and even that is never the whole bill.

A base MFN (Most Favored Nation) rate, set by whichever HTS subheading your product actually falls under — search by the code, not the product name, because customs doesn’t care what you call it. “Hoodie” and “sweatshirt” can land in different subheadings depending on the knit.

A Section 301 tariff stacked on top — country-specific, separately published, and the layer that’s actually shifted under us mid-quote before.

We will check hts.usitc.gov website by ourselves before each time when we quote hoodie — not because we don’t know our own product’s code by now, but because the rate attached to it has moved before, and printing yesterday’s number on today’s quote is how a factory loses a customer’s trust in one invoice. The Section 301 rate is published and updated by the Office of the United States Trade Representative at ustr.gov — that page, not a blog post, is current the day you read it.

Anchor these two to the real official pages when the post goes live: hts.usitc.gov (HTS lookup) and ustr.gov (Section 301 actions/lists). Do not link a third-party “tariff guide” site as the authority — that undercuts the entire point of this article.

Why every "current tariff rate" you read online is already out of date

We pulled five tariff guides while writing this, published within weeks of each other. One said 7.5%. Another said a new country-specific rate had just replaced a temporary global tariff, putting the combined number in the low-to-mid teens. One said combined duty on Chinese apparel runs “well above 30% in most cases.” All three were right — for the week they were published, for the HS code they happened to be talking about. None of them were talking about your order.

That’s the actual lesson, and it’s also why we stopped printing a fixed percentage in our own marketing a while back: the rate moves at any time, sometimes inside the gap between your deposit and your ship date. A number we can’t stand behind on the day the container clears isn’t a number worth printing.

A worked example: 300 pcs custom hoodies, FOB vs. DDP

Numbers are easier to trust when you can see where they came from, so here’s one built off our own published pricing instead of a hypothetical.

Order detail Value
Product Standard 280gsm pullover hoodie, custom dye, printed logo, woven label
Quantity 300 pcs (one colourway)
FOB unit cost at this volume $3.00–$4.00/pc (our published 300–499pc tier)
FOB total $900–$1,200
HS code 6110.20 (cotton hoodie/sweatshirt)
Base MFN duty ~16.5% of declared value for HS 6110.20.20 (verify current rate at hts.usitc.gov for your exact code)
Section 301 add-on Varies — check the current list at ustr.gov before you budget; this is the layer that has moved the most in 2026

Add duty on top of the FOB total, then add international freight, US customs brokerage, and last-mile delivery, and you get your landed cost per piece — the number that actually decides your margin, not the FOB price on the quote. Two ways this plays out once the container’s by sea.

Route 1 — FOB, you handle customs

We quote it as FOB price for you, and then you need pay the sea freight, duty, and brokerage separately once your goods clear a US port. You keep the pen on which forwarder and which broker you use — and you also keep three separate invoices to reconcile before you actually know your per-piece cost. If your broker files the wrong HS code, you find out after the container’s already sitting in a bonded warehouse, not before.

Route 2 — DDP, one number, no customs handling

We quote delivered duty paid instead: freight, duty, brokerage, and last-mile are already folded into one number before you approve the order. You’re not adding up three invoices to find your real cost, and if this is your first time clearing a container through US customs, you never have to learn how on this order — we’ve already done it on someone else’s. This is the version most private label orders go with, because it turns your landed cost into one number you can put straight into your own retail math.

DDP isn’t automatically cheaper. You’re paying us to hold the customs risk instead of holding it yourself, and if you already have a broker and a freight rate you trust, FOB can win. Ask for both numbers on the same quote. Most suppliers will only hand you one — usually whichever is easier for them to write.

The same two-layer math applies whether you’re pricing a custom sweatpants order or a hoodie run — the HS code changes, the stacking logic doesn’t.

What we actually put on your written quote

This is the part that made us write this article in the first place. Most sourcing content — ours included, until a customer called us out on it two quotes ago — says “budget roughly X% for duty” and stops there. A range isn’t a number you can put in a spreadsheet and defend to your own buyer.

On your quote, before you pay a deposit, you get:

  • The base MFN rate for your HS code
  • The Section 301 rate in effect as of your production date, not the date you first asked — that’s the date the rate that actually applies gets locked in
  • The combined rate, written as one line — Combined duty: [rate]%, as of [production date] — tied to your order value, not a range
  • A DDP quote next to the FOB quote, so you can compare the all-in number instead of doing your own duty math on the back of the invoice

If a sourcing guide handed you a duty percentage without asking your HS code or your production date, that number was a guess wearing a suit. Ours is arithmetic against your actual purchase order.

A landed cost calculator you can use on any quote — not just ours

We have this open in a browser tab every time we build a quote — not a polished internal tool, just a spreadsheet with the same ten rows below. Copy it into your own and run it against any supplier’s FOB number, not only ours.

Line item Your number Where it comes from
FOB unit cost ____ Supplier’s quote
Order quantity ____ Your PO
FOB total = unit cost × quantity Calculated
Base MFN duty rate ____% hts.usitc.gov, by your HS code
Section 301 rate ____% ustr.gov, current list
Combined duty amount = FOB total × (MFN% + 301%) Calculated
Freight (ocean/air) ____ Your forwarder’s quote
Customs brokerage fee ____ Your broker’s quote
Landed total = FOB total + duty + freight + brokerage Calculated
Landed cost per piece = landed total ÷ quantity This is your real cost

No email required to use it. If you’d rather hand us your quantity and target garment and let us fill in both the FOB and DDP rows ourselves, that’s what the quote request on our hoodie page is for.

Download the Excel calculator

FAQ

The answer is No — it depends on the HS code, and garment type changes the code more often than people expect. Knit versus woven, cotton versus a synthetic blend, hoodie versus jacket can all land under different subheadings with different base rates and different Section 301 list assignments. Check by code, not by the name on your spec sheet.

Yes, and it’s happened on orders we’ve quoted. That’s why our written number is dated to your production date, not the day you first emailed us — quoting off a rate that was true when you asked but not when you shipped is how buyers get an invoice they didn’t budget for, and it matters most on a low-MOQ first order where the margin is already tight.

Not automatically — see the FOB vs. DDP section above. Ask for both on the same quote and compare them for your actual order instead of assuming one is always cheaper.

Both layers of your import duties from China to the USA are published openly. hts.usitc.gov for the base HTS rate — search by code, not product name. ustr.gov for current Section 301 actions and lists. Both are free, no login.

Generally your declared FOB purchase value, not your retail price. If you need this confirmed for a specific filing, that’s a question for your customs broker or cbp.gov — we’ll tell you what we know, but we’re not the ones signing your entry summary.

We don’t calculate it ourselves. We quote the rate published at hts.usitc.gov and ustr.gov as of your production date, and you can check both against our number before you pay a deposit. If our rate doesn’t match the official page on that date, don’t order.

Sources referenced in this article

These are the same pages Renrui Textile checks before writing any US quote.

  • U.S. International Trade Commission — HTS lookup: hts.usitc.gov
  • Office of the U.S. Trade Representative — Section 301 actions: ustr.gov
  • U.S. Customs and Border Protection — import valuation guidance: cbp.gov

Glass Beads vs Poly Pellets for Weighted Blankets

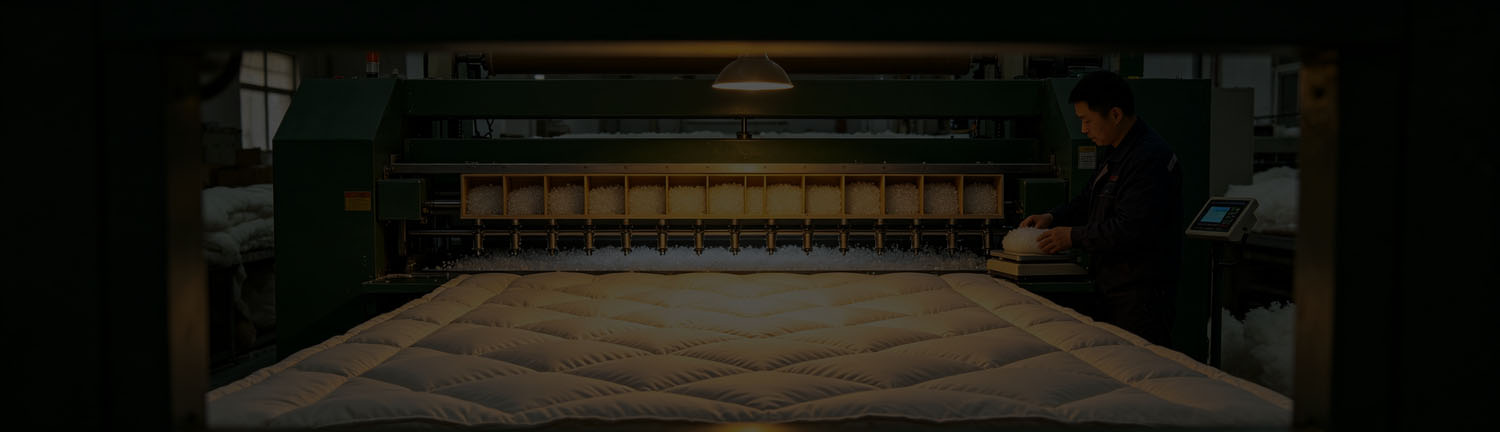
The real question is not which filling is "better." It is which construction keeps either one from sliding to the corners after the twentieth wash — and that is the part every blog post about this topic skips, because it is not a filling question. It is a factory question.

We are Renrui Textile, a home textile OEM manufacturer in Suzhou, China. We run glass beads and poly pellets side by side on the same quilting lines, and the choice between them matters less than most people think. What matters more — and what this page will explain with specifics — is the stitch pattern holding them in place.

There is a free spec sheet at the bottom. Excel and PDF, no email required.

The Real Difference Between Glass Beads and Poly Pellets

You will see “glass beads are 2x denser than poly pellets” repeated everywhere online. We looked for a single source that actually measured it and could not find one — so we will not repeat it as fact. What we can tell you from running both on the same production floor: beads let us build a slimmer panel for the same target weight.

Glass Micro-BeadsPoly Pellets
Feel / sizeFine, sand-like grainLarger, pea-sized pellet
Weight-to-volumeNoticeably denser — same weight fits a thinner, less bulky panelLower density — needs more volume for the same weight
NoiseSilentCan have a faint rustle when the blanket is shaken
Wash careMore sensitive to repeated tumble-dry heat over yearsMore heat-tolerant, more forgiving on care labels
Typical use casePremium / slim-profile lines, adult retailKids’ lines, budget / heavier-use lines

Both materials are available across our weighted blanket OEM line. Both carry OEKO-TEX Standard 100 and GRS 4.0 certified shell fabric options. Neither choice locks you out of a certification requirement.

What Actually Stops the Fill from Shifting (It Is Not the Material)

Both fillings shift if the panel is too big. That is a stitching decision, not a filling decision — and it is the part every comparison article skips because it cannot be judged by reading a spec sheet online. It has to be built.

Baffle-Box Construction

Baffle-box construction stitches internal fabric walls that form small 3D pockets — the fill can move slightly within its own box but cannot migrate to a neighboring section or pool at one edge. It costs more machine time and more fabric (the internal walls use extra yardage), which is why most DTC brands do not offer it: they buy finished goods off a shared production line and cannot control the construction.

Channel-Stitch Construction

Channel-stitch construction sews straight-line channels instead of boxes. Faster to produce, lower cost, and still keeps the fill from sliding end-to-end — the tradeoff is the fill can settle slightly lengthwise within its channel over time, which shows up as a firmer strip near the bottom edge after months of use.

We run both. Baffle-box for lines positioned on even weight distribution as the selling point; channel-stitch for price-competitive lines where the channel settling is an acceptable tradeoff. Either way, every unit gets weighed before it shipsnot sampled, checked — so the spec you approved on the sample is the spec that ships, regardless of which construction you pick. Fill weight is verified within ±3% per unit, in addition to our standard 3-point in-line QC to AQL 2.5.

How Heavy Should a Weighted Blanket Be? (Weight Chart)

The widely cited guideline — used by the Sleep Foundation and most manufacturers — is 10% of body weight, with a comfortable range of 5–12%. This is not a hard rule (individual preference varies), but it is a reliable starting point for product development. Below is the full weight-to-body chart, included in the free download at the bottom of this page.

Body WeightSuggested Fill Weight (10%)Common Retail Range
100–120 lbs10–12 lbs10 lb
130–150 lbs13–15 lbs15 lb
160–180 lbs16–18 lbs15–20 lb
190–220 lbs19–22 lbs20 lb
230+ lbs23+ lbs (practical ceiling ~25–30 lb)25 lb
Kids (3+ yrs, 50+ lbs)10% of body weight + 1 lb5–10 lb
Couples sharing one blanket7.5% of combined body weight

Safety note: Weighted blankets are generally recommended for children aged 3 and older who weigh at least 50 pounds. For therapeutic or medical use, confirm the target fill weight with a healthcare provider. These numbers are product-development guidelines, not medical advice.

See Our Weighted Blanket Manufacturing
Free download — no email required

Fill Weight + Material Spec Sheet

Two-page reference: the full body-weight-to-fill chart on page one, plus a side-by-side glass beads vs poly pellets comparison and baffle-box vs channel-stitch spec guide on page two. Use it for your own product specs, share it with your team, print it for a buying meeting. No attribution needed, no form to fill in.

Download the Excel spreadsheet Download the printable PDF

Want us to quote your spec? Send us your filled-in target weights and we will quote your MOQ the same business day — send us your target weights for a same-day quote.

Frequently Asked Questions

Neither is objectively better — they serve different product positions.

Glass beads are denser and silent, making them the default choice for premium adult lines where a slimmer panel and zero noise matter. Poly pellets are more heat-tolerant on the care label and more forgiving of repeated machine drying, which suits kids’ lines and budget price points.

The factor that matters more than the material choice is the stitch construction holding either fill in place — without baffle-box or tight channel quilting, both materials will migrate toward the edges over repeat use. We run both materials on the same production lines, and the construction spec is the decision that determines whether the blanket holds its shape after a year, not the fill type.

The stitch construction, not the fill material.

Baffle-box construction sews internal fabric walls that create small 3D pockets — the fill stays locked within its own box and cannot migrate to neighboring sections.

Channel-stitch construction uses straight-line stitched channels that keep the fill from sliding end-to-end, though minor settling within the channel is possible over months of use.

Baffle-box costs more in machine time and fabric but delivers the most even long-term distribution; channel-stitch is faster and more cost-effective. We offer both and confirm your choice at quoting based on your target retail position.

The widely cited industry guideline is 10% of body weight, with a comfortable range of 5–12%. A 150 lb person would target a 15 lb blanket; a 200 lb person would target 20 lb.

For children aged 3+ who weigh at least 50 lbs, the guideline is 10% of body weight plus one pound. For couples sharing a single blanket, target roughly 7.5% of combined body weight.

These are product-development starting points, not medical recommendations — individual preference varies. The full weight chart is in the free spec sheet on this page.

Weighted blankets are generally considered safe for children aged 3 years and older who weigh at least 50 pounds. The fill weight for children is typically 10% of body weight plus one pound.

A child should be able to remove the blanket independently. For therapeutic or sensory use, confirm the target weight and construction with a healthcare provider — the guidelines above are product-development references, not medical advice.

Every unit we produce is individually weighed before packing and checked within ±3% of its stated weight. This is not a batch sample — it is per-unit verification, in addition to our standard 3-point in-line QC to AQL 2.5.

We check every piece for weight specifically because an inaccurate weighted blanket is the product failing at its one job.

Get a Manufacturing Quote With Your Target Spec

Send Us Your Spec for a Same-Day Quote

French Terry vs Fleece: The GSM Guide for Hoodies & Joggers

If you’re putting your first hoodie or jogger into production, the fabric-weight question is where the order quietly goes right or wrong — and it’s the one thing almost no one explains straight. Search “french terry vs fleece” and you’ll get a dozen blogs telling you french terry is “breathable” and fleece is “cozy,” then nudging you toward whatever they happen to sell. None of them tell you what each choice does to your cost, your MOQ, or your freight bill.

I’ve spent years on the factory side of exactly these garments — cutting and sewing hoodies, crewnecks and joggers in every weight from 240 to 500 gsm. So here’s the version with the numbers in it: what french terry and fleece actually are, what GSM to pick for which garment, and the cost and durability trade-offs the fabric blogs leave out.

What French Terry Actually Is (and What Fleece Is)

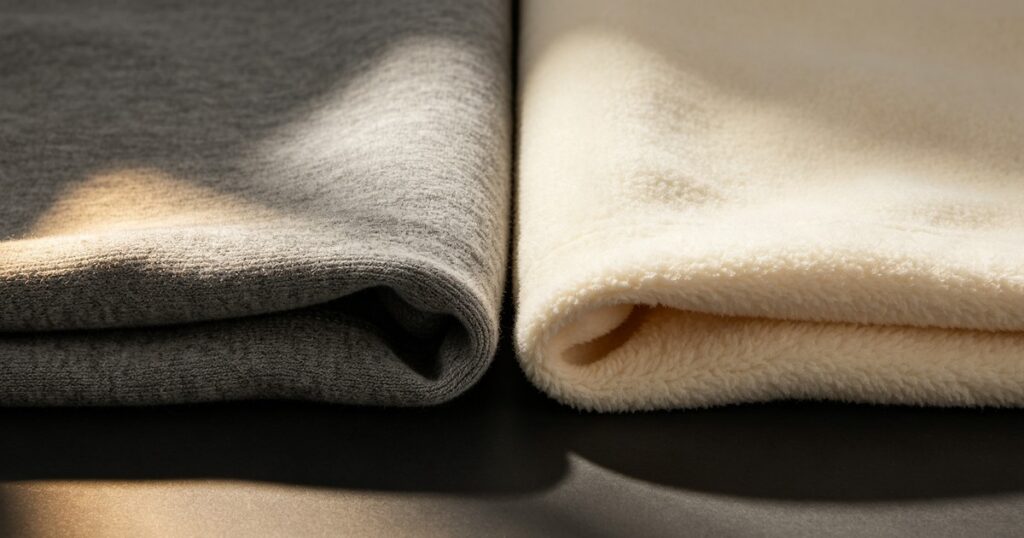
French terry is a knit fabric with a smooth face and small unbrushed loops on the inside — the same loop-back you see on a classic crewneck sweatshirt. Those loops trap a little air, so it’s warm without being bulky, it breathes, and it holds its shape. Because the surface is flat and stable, it takes print and embroidery cleanly. It’s the fabric most “premium heavyweight” streetwear is built on.

Fleece — specifically brushed-back or “sweatshirt” fleece — usually starts as french terry and then gets the inside brushed into a soft, fuzzy nap. That brushing is what makes fleece feel plusher and warmer at the same weight. The trade-off: the brushed surface is what pills over time, and it gives you a slightly softer, less crisp print surface.

So they’re cousins, not opposites. A lot of “fleece” hoodies are brushed french terry. The real decision isn’t a brand name — it’s brushed or not, and how heavy.

French Terry vs Fleece: The Honest Comparison

 French Terry (unbrushed)Brushed Fleece
Inside surfaceSmall loops, structuredBrushed, soft nap
Warmth (same GSM)Moderate, breathableWarmer, cozier
Drape & structureHolds a boxy, structured shapeSofter drape, less structure
Print / embroideryCrisp, stable surfaceGood, slightly softer edges
Pilling over timeLower — no brushed nap to pillHigher at the brushed surface
Best forStructured streetwear, year-round hoodies, joggers that keep their shapeCozy loungewear, winter hoodies, ultra-soft feel

Quick rule from the cutting floor: if you want a hoodie or jogger that photographs structured and holds its silhouette drop after drop, french terry. If you want the softest, warmest, “live-in-it” feel and you’re OK with it relaxing over time, brushed fleece. For a structured heavyweight streetwear look, we build most programs in french terry (often 400 gsm+) precisely because it doesn’t collapse.

The GSM Guide: What Fabric Weight to Pick, by Garment

GSM (grams per square meter) is just how much a square meter of the fabric weighs — the single best proxy for how substantial a garment feels. “Heavyweight” is a marketing word; a GSM number is a spec. Here’s the range we and most cut-and-sew factories actually work to, by product:

GarmentLightStandardHeavyweight
T-shirt (combed cotton)140–180 gsm180–220 gsm220–280 gsm
Hoodie / crewneck280–320 gsm320–380 gsm400–500 gsm
Joggers / sweatpants240–280 gsm300–350 gsm400 gsm+

What the numbers feel like in the hand:

280–320 gsm hoodie — a comfortable, everyday weight. Not “premium heavyweight,” but it drapes well and costs less. Good for spring/fall drops and promo.

320–380 gsm hoodie — the sweet spot for most brands. Substantial without being stiff, holds a print, survives repeat washing.

400–500 gsm hoodie — the boxy, structured streetwear weight that stands off the body. This is what most “heavyweight” hype brands actually run. It’s also where cost and freight start to climb (more on that below).

240–280 gsm joggers — light, drapey french terry joggers, good for a slouchy or wide-leg fit.

400 gsm+ joggers — structured heavyweight joggers to match a heavyweight hoodie in a set.

One warning about the very top of the range: those “1000 gsm” or “1800 gsm hoodie” listings you’ll see are almost always doubled/bonded constructions or marketing math, not a single-layer knit. A genuine single-layer heavyweight tops out around 500 gsm before it stops behaving like a wearable hoodie.

See Our Hoodie Manufacturing Specs

The Part the Fabric Blogs Skip: GSM Drives Your Cost

Heavier fabric isn’t just warmer — you’re literally buying more grams of cotton per garment, so the unit cost climbs with the weight. This is the number no “french terry vs fleece” article gives you, so here it is from our own published factory pricing.

On our joggers program, the same style steps up roughly like this at a 100-piece start (factory-direct FOB):

Jogger constructionSmall batch (100 pcs, FOB)
Lightweight french terry (240–280 gsm)$4.90–6.50
Midweight brushed fleece (300–350 gsm)$6.50–8.50
Heavyweight french terry (400 gsm+)$9.00–11.00

So going from a light jogger to a heavyweight one can nearly double the unit cost — before you’ve added a single print. The same pattern holds on hoodies. That doesn’t make heavyweight wrong; it makes it a decision. A 450 gsm hoodie at a premium retail price is a great business. A 450 gsm hoodie you priced like a 300 gsm one is a margin problem you built in at the fabric stage.

Two more costs the weight quietly moves:

Freight. Sea and air freight are priced partly by weight. A carton of 400 gsm hoodies weighs meaningfully more than the same carton in 300 gsm, so your per-unit landed cost goes up on both the fabric and the shipping.

MOQ math. Custom-color heavyweight fabric can carry a higher fabric minimum than a stock light weight, because the mill runs it to order. If you’re testing, a lighter stock weight often lets you start smaller. (We break down how minimums really work on our low MOQ clothing manufacturer page.)

Shrinkage and Pilling: What Actually Happens After the First Wash

Two durability realities to build into your spec, not discover in your reviews:

Shrinkage. Cotton french terry and fleece can pull in 5–8% off the roll if the factory doesn’t handle it. The fix is boring and non-negotiable: pre-shrink the fabric before cutting, and confirm finished measurements on the proto sample. Ask your factory whether shrinkage is controlled before cutting — if the answer is vague, your medium becomes a small on laundry day.

Pilling. This is where the brushed-fleece trade-off shows up. The soft nap that makes fleece feel great is also the surface that pills with wear and washing. French terry, with no brushed nap, generally stays cleaner-looking longer. If your brand lives on looking sharp after six months, that matters more than the first-touch softness.

How to Spec Fabric to a Factory (So You Get What You Approved)

Whether you work with us or anyone else, spec it like this and you remove the most common surprises:

1. State the GSM in writing. Not “heavyweight” — “420 gsm french terry.” A factory that controls its fabric gives you the number instantly.

2. Get a swatch before the sample. Feel the weight and the hand yourself. A swatch costs almost nothing and settles most arguments.

3. Weigh your proto. Put the sample on a kitchen scale against the stated GSM. This is how you catch a quiet downgrade between the sample you approved and the bulk you paid for.

4. Confirm brushed vs unbrushed and pre-shrink. Two lines in your tech pack that prevent two of the biggest post-delivery complaints. New to tech packs? Start with our clothing tech pack guide and free template.

Free: Fabric-Weight Cheat Sheet

Bookmark this table — it’s the whole decision on one screen. No email required; if you want, send us your target garment and we’ll pull a real swatch and quote it against your weight.

If you want…PickTypical GSM
Structured streetwear hoodie that holds its shapeFrench terry400–500 gsm
Everyday, cost-effective hoodieFrench terry300–350 gsm
Coziest, warmest winter hoodieBrushed fleece350–450 gsm
Slouchy / wide-leg joggers with drapeFrench terry240–280 gsm
Heavyweight joggers to match a hoodie setFrench terry400 gsm+
Ultra-soft loungewear setBrushed fleece280–340 gsm

If you’re already at the sourcing stage, our custom hoodie manufacturer and custom sweatpants & joggers pages list the exact weights and FOB pricing we run, and our streetwear clothing manufacturer page covers the heavyweight end. We’re a cut-and-sew factory (Renrui Textile) — we sew from fabric to your pattern, so the weight is yours to choose, not a blank you’re stuck with.

FAQ

French terry is a knit fabric with a smooth face and small unbrushed loops on the inside — the same loop-back used in classic crewneck sweatshirts. The loops trap a little air, so it’s warm but breathable, and the flat, stable surface holds its shape and takes print and embroidery cleanly. It’s the fabric most heavyweight streetwear hoodies and structured joggers are built on.

Brushed fleece usually starts as french terry, then has its inside brushed into a soft, fuzzy nap. That brushing makes fleece feel plusher and warmer at the same weight — but the brushed surface pills more over time and prints slightly softer. French terry, left unbrushed, is more structured, holds its shape better, and pills less. French terry for structured streetwear that keeps its silhouette; brushed fleece for the coziest, warmest feel.

280–320 gsm is a comfortable everyday weight, 320–380 gsm is the sweet spot for most brands, and 400–500 gsm is the boxy structured streetwear weight. Above ~500 gsm a single-layer knit stops behaving like a wearable hoodie, so “1000+ gsm” listings are usually bonded or marketing math. Heavier fabric costs more per unit and weighs more to ship, so match the weight to your price point.

Lightweight french terry joggers run 240–280 gsm for a drapey or wide-leg fit; midweight is ~300–350 gsm; heavyweight structured joggers run 400 gsm+. On our pricing, a lightweight french terry jogger starts around $4.90/pc FOB at 100 pieces and a 400 gsm+ heavyweight runs $9–11 — the weight roughly doubles the unit cost.

Both can. Cotton french terry and fleece can pull in 5–8% off the roll if the factory doesn’t pre-shrink before cutting and confirm finished measurements on the proto sample. Ask whether shrinkage is controlled before cutting, and always wash your sample before approving bulk.

How to Start a Clothing Line: What It Really Costs (From a Factory)

Before anything else, read the byline on whatever guide you are reading. Search “how to start a clothing line” and the results are written, almost without exception, by print-on-demand platforms. Their guides are long, genuinely well made, and free — and they all arrive at the same conclusion, which is that you should use print-on-demand. That is not a conspiracy. It is just what happens when the people answering the question get paid based on your answer.

We are Renrui Textile, a garment factory in Suzhou, China. We are on the other side of that trade: we make money when you place a cut-and-sew order, and we make nothing when you choose print-on-demand. So take everything below with that in mind — and notice that we are going to spend the next section telling you exactly when print-on-demand is the right call anyway, because the numbers say so, and pretending otherwise would waste your money and our time.

What follows is what it actually takes to start a clothing line, written from the factory floor: real costs, real minimums, real timelines, and the line items nobody puts in writing.

What It Actually Costs to Start a Clothing Line: The $50,000 Myth

The figure you will see repeated is that starting a clothing line costs “$2,000 for print-on-demand, or $50,000 and up for cut-and-sew”. That number is not a lie exactly, but it describes a brand launching a full seasonal collection across many styles and colourways, with a designer, a pattern maker and a container.

It is not what a first order costs. Here is the actual arithmetic for a first production run, using our own published FOB prices.

A 100-piece cut-and-sew hoodie run lands at roughly $12–18 a unit. The same hoodie through print-on-demand lands at $28–38.
Cost component (100 units)Print-on-demandCut-and-sew (our FOB)
Garment~$18–24 (blank + print markup)~$9–12 (cut-and-sew, your fabric and fit)
Decoration (print / embroidery)included above$0.80–$2.50 depending on technique
Label & packagingbasic tear-away only$0.35–$0.80 (woven label + polybag + hangtag)
Shippingincluded (domestic) or per order~$2.00–$3.00 / unit sea freight
Landed total$28–38 / unit$12–18 / unit

At a $60 retail price, that is the difference between a 40% gross margin and a 75% one. On 100 units it is roughly $1,600 of margin you either keep or hand to a platform. That gap is the entire reason cut-and-sew exists.

So where does $50,000 come from? It comes from doing it at scale, in many styles, all at once. It is not the entry price. The entry price is one style, one or two colours, 100 pieces per colour. At our tee pricing that is somewhere around $90–150 of garments plus a sample. That is the real floor, and almost nobody writing about this will tell you, because almost nobody writing about this is a factory.

When Print-on-Demand Is Genuinely the Right Choice

Here is the part we lose money on. Print-on-demand is the correct decision, and you should not be talking to a factory yet, if any of these is true:

  • You have not proven that anyone wants this. If you do not yet have an audience, a waitlist, or a single pre-order, buying 100 pieces of anything is buying inventory to store in your bedroom. POD lets you find out whether the design sells before you spend money making it.
  • The graphic is the product. If your brand’s whole differentiation is the artwork on a standard tee, a standard tee is what you need. The blank is not the point. Cut-and-sew would be paying to customise something your customer is not buying you for.
  • You want dozens of designs live at once. Testing thirty graphics is a POD workflow. It is not a manufacturing workflow, and any factory that tells you otherwise is quoting you thirty separate development projects.
  • Cash flow cannot survive a deposit. Manufacturing means paying before you sell. If that would break you, POD’s pay-as-you-sell model is not a compromise, it is the correct tool.

We are a factory saying this in writing because it saves everyone a wasted month. Roughly a third of the enquiries we get should be print-on-demand orders, and telling them so at the first email is cheaper for us than sampling something that will never reach bulk.

Where print-on-demand stops working

And then, usually somewhere between the second and the tenth month, three things happen at once.

The margin stops. You cannot discount, you cannot run a bundle, you cannot afford wholesale, and you cannot pay for ads — because there is no room in $28–38 of cost against a $60 retail. POD margin does not improve with volume. It is a fixed ceiling, and once you hit it, the only growth left is more traffic at the same thin margin.

The product stops being yours. You cannot change the fabric weight. You cannot change the fit. You cannot move the shoulder seam, use a heavier rib, line the hood, or put your own woven label in the neck. Every competitor printing on the same blank has an identical garment. When a customer says “the quality feels cheap”, you have no lever to pull.

Reorders become the business. The day a style starts selling repeatedly is the day the maths flips, because a repeat cut-and-sew order needs no new sampling — for us it ships in 10–15 days, and the unit cost drops again at 500 pieces.

The honest summary, if you are deciding how to start a clothing line right now: POD is a testing tool. Cut-and-sew is a business model. Use the first to find out what sells, then switch. The mistake is not starting with POD; the mistake is staying on it after it has told you the answer.

What a First Cut-and-Sew Run Actually Costs, Line by Line

These are our published FOB prices at small-batch volume — 100 pieces per colour — and at bulk. Not a range invented for an article; the same numbers we quote.

CategorySmall batch (100 pcs / colour, FOB)SampleBulk (500+ pcs, FOB)
Tank tops$1.50–$2.30$6.50–$10.50$0.60–$1.10
T-shirts$1.80–$3.00$8.50–$15$0.80–$1.40
Crewneck sweatshirts$3.80–$5.50$11.50–$18.50$2.70–$3.50
Pajama sets (knit)$4.00–$5.50$2.30–$3.10
Hoodies$4.80–$6.50$11.50–$20$2.60–$3.50
Leggings / activewear$4.80–$7.00$16–$23$3.00–$4.40

On top of the unit price there are exactly three things, and no others:

  • A sample fee — the table above. Ours is credited back against your bulk order, which is worth checking anywhere you buy: a factory offering a free sample is making a sales tool, and a factory charging for one is making a garment. Pay for the sample.
  • Labels and packaging — $0.35–$0.80 a unit for a woven label, polybag and hangtag. One thing to know before you design a woven label: the loom has a fixed setup, so woven labels have their own minimum, typically 100 per colour. Printed labels go lower. At 100 pieces, plan for that.
  • Freight — roughly $2.00–$3.00 a unit by sea at these volumes. Air is faster and several times that.

There are no tooling charges, no setup fees and no plate charges on standard constructions. If a quote contains those, ask what they are for.

So what does the first order really come to?

Take the most common first run we see: one tee style, two colours, 100 pieces each.

100 tees at $1.80–$3.00 is $180–$300. A sample is $8.50–$15, credited back later. Labels and packaging at $0.35–$0.80 adds $35–$80. Sea freight at $2.00–$3.00 adds $200–$300. You are looking at roughly $425–$700 landed, before duty — for a hundred garments that are genuinely yours, in your fabric, with your label in the neck.

That is what it costs to start a clothing line properly, and it is the number the $50,000 figure is hiding. It is not a small amount of money. It is also not a barrier, and it is roughly what a POD brand spends on ads in a fortnight.

The Line Item Nobody Writes About: Duty

Every guide on this topic stops at FOB. Then the goods arrive in the US and the founder discovers that the landed cost is not the quoted cost, and the margin they modelled does not exist.

If you are importing apparel from China to the United States, there are two numbers stacked on top of each other. The MFN base duty, which for most knit apparel sits around 12%. And the current Section 301 rate, which has moved violently and repeatedly, and which no honest factory will print as a fixed percentage on a webpage because it will be wrong by the time you read it.

If you want to see both numbers taken apart on a real order, we did it on a 300-piece hoodie run — FOB against DDP, plus a landed cost calculator you can run on any supplier’s quote: how the two rates stack on an actual invoice.

What matters is not the number. It is whether the factory will put the number in writing, on the quote, as its own line — calculated on the day you order.

That is what we do: the duty is quoted as a separate line on the pro-forma, at the rate that actually applies on the day, so the landed cost you model is the landed cost you pay. And if you would rather not touch customs at all on a first import — which for most first-time founders is the right answer — ask for DDP, delivered duties paid, where the goods arrive at your door with duty already inside a single price.

When you compare factory quotes, this is the question that separates them. Most will quote FOB and go quiet about the rest. Ask every one of them: “Will you write the current duty rate into the quote as its own line, and can you ship DDP?”

Start With One Product, Not a Collection

The single most expensive mistake we watch people make when they start a clothing line is launching a collection. Six styles, four colours each, because that is what a brand looks like on Instagram. That is twenty-four separate production runs, twenty-four fit risks, and a warehouse of the twenty-two that did not sell.

Launch one style. Get it right. Let the market tell you the second one.

Two things about minimums that will shape this decision, and they are not the same thing:

  • Fabric dyed to your colour: 100 pieces per colour. Each colour needs its own dye run — that is a physical constraint of the dye vat, not a sales policy. But sizes are mixed freely inside those 100. XS to XXL in one go, with no size multiplier. Ask this question specifically, because a lot of factories quote “100” and then require 100 per size, which is a 300-piece order wearing a 100-piece label.
  • Colours are counted separately. Each colour needs its own dye run, so the minimum applies per colour — four colours is four times the minimum, not one. A factory offering you four colours inside a single 100-piece order is either selling you blanks or will renegotiate after your deposit clears.

The practical move for a first run: one colour, all sizes. You find out whether the garment sells before you tie up cash in a colour range.

What You Need Before a Factory Can Quote You

You do not need to be a designer, and you do not need software. You need to have made the decisions.

A factory quoting your style is reading for three things, in this order: can we source this, can we sew it at the rate we quoted, and what will we be measured against at inspection. Every question your brief does not answer gets answered anyway — by someone in the factory, quickly, according to what is normal for them rather than what was in your head.

In practice you need one of two things:

A reference garment. Post us something you already own and love. A pattern maker can measure it, feel the fabric and read the construction directly, and it will teach a factory more in ten minutes than forty pages will. Say clearly what you want to keep and what you want to change — “this fit, this weight, 3cm longer in the body, heavier rib” is a brief we can act on today. This is the cheapest, highest-value thing a first-time founder can do, and it costs a courier fee.

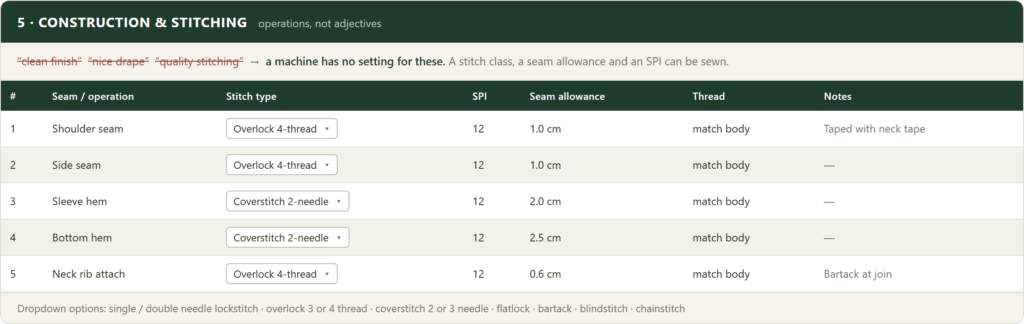
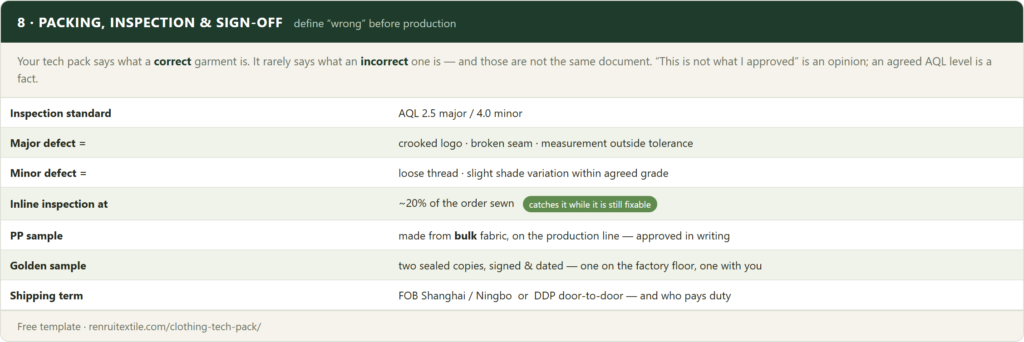
Or a tech pack. The specification document: flat sketch, bill of materials with fabric weight and composition, measurements in every size with tolerances, construction written as stitch types rather than adjectives, labels and packaging, and your inspection standard. If that sounds like a lot, it is — and it is also the difference between a quote you can rely on and a quote that moves the moment reality arrives. We wrote the full guide separately, with a free clothing tech pack template you can download without giving anyone your email.

You do not need a perfect one to start a conversation. You do need one before you place an order.

See What a Factory Needs to Quote You

The Timeline, Honestly

From first email to sellable stock is realistically eight to twelve weeks. Here is where that time actually goes, using our own lead times.

StageTimeWhat decides it
Brief & quotation2–5 daysA complete brief is quoted fast. An incomplete one becomes a round of questions first — that round is where most of the delay lives.
Sampling7–10 daysPlus shipping to you, plus your review. Budget for one revision; most styles need one.
Bulk production25–40 daysAfter you approve the sample — not after you place the order.
Sea freight25–35 daysPort to port, plus customs. Air is about a week and several times the cost.
Reorder10–15 daysNo new sampling. Tooling and spec already exist. This is where a factory relationship starts paying.

Note where the real advantage sits. The first order is slow because everything is being decided for the first time. The second order ships in 10–15 days — which is the entire reason a growing brand stops thinking about unit price and starts thinking about who it manufactures with.

Payment is normally 30% deposit, 70% before shipping, and it should be escrow-protected. Ask.

Before You Send Anyone Your Designs

There is a question underneath this whole process that most founders think but do not ask: you are about to email your complete product design to a factory you have never met, in a country you have never visited. What stops them from making it for someone else?

It deserves a contractual answer rather than a reassuring one. Ask for three things in writing, before you attach a single file:

  • An NDA signed before the files move — not after the quote, not with the deposit. A factory that will not sign one before seeing your design has told you something useful for free.
  • A no-resale clause in the production contract. This one does more work than the NDA and almost nobody asks for it. It states that your design, patterns and samples are not resold, not listed in the factory’s own catalogue, and not produced for anyone else.
  • Ownership of the patterns and tech pack. Your patterns are yours; if you leave, they leave with you. A factory that treats the pattern it graded from your spec as its own property has quietly locked you in, and you will find out on the day you try to move.

We put all three in writing, because it is the question private label buyers ask us more than any other.

Your First 30 Days

Concretely, if you are starting a clothing line from nothing:

  • Week 1 — pick one product and one customer. Not a collection. Not “streetwear”. One garment, and a specific person who is already buying something like it and complaining about something specific.
  • Week 1 — buy the three garments closest to what you want. Wear them. Wash them. Decide what you would change. This is your brief, and it is worth more than a mood board.
  • Week 2 — write the spec. Fabric weight, fit, construction, labels, packaging. Use the tech pack template if you want the structure handed to you.
  • Week 2 — email three factories the same brief. Same document, same questions, same day. What comes back tells you more than any directory. Ask each of them: what is your MOQ per colour and is it per size? Is the sample fee credited? Will you write the duty into the quote? Will you sign an NDA before I send files?
  • Week 3 — pay for samples. From the two factories that answered best. Yes, both. A second sample costs less than a wrong bulk run.
  • Week 4 — sell before you produce. Photograph the sample. Take pre-orders, run a waitlist, post it. Fifty pieces is small enough that pre-orders can genuinely cover it — and if nobody pre-orders a sample they can see, they were not going to buy a hundred of them either.

None of that requires funding, and none of it requires a big order. Starting a clothing line requires asking the questions before production instead of after — and the factories that get annoyed at these questions have told you something useful about themselves, for free.

FAQ: Starting a Clothing Line

A realistic first cut-and-sew order — one style, two colours, 100 pieces each — comes to roughly $425–$700 landed before duty, using our published FOB pricing: $180–$300 for 100 tees, $8.50–$15 for a sample (credited back against bulk), $35–$80 for labels and packaging, and $200–$300 in sea freight. Heavier categories cost more: hoodies run $4.80–$6.50 a piece at 100 pieces per colour rather than $1.80–$3.00. The widely quoted “$50,000 to start cut-and-sew” figure describes launching a full seasonal collection, not a first order.

Start with one product, not a collection, and use a physical reference garment instead of a design. Buy the three garments closest to what you want, decide what you would change, and send one of them to a factory with those notes — a pattern maker can read a real garment far better than a beginner’s sketch. You do not need design software, a degree, or a pattern maker of your own. You do need to have made the decisions: fabric weight, fit, construction, labels, packaging and quantity.

They answer different questions. Print-on-demand is the right tool when you have not yet proved anyone wants the product, when the graphic is the product, or when cash flow cannot survive a deposit — it lets you test without inventory. A manufacturer is right once a style sells repeatedly, because POD margin has a fixed ceiling: about $28–38 landed per hoodie versus $12–18 cut-and-sew at 100 units. POD is a testing tool; cut-and-sew is a business model. The mistake is not starting with POD, it is staying on it after it has told you the answer.

For fabric dyed to your colour, 100 pieces per colour is the practical floor — each colour needs its own dye run. Ask two things specifically: are sizes mixed freely inside those 100 (ours are, with no size multiplier — a lot of factories quote 100 and then require 100 per size), and is the minimum counted per colour or per style (ours is per colour, because each colour needs its own dye run — so plan a single colour for a first run). Be wary of “no minimum”, which usually means relabelled stock garments rather than production.

Not to start a conversation, but you need one before you place an order. A factory quoting without a spec is quoting its own assumptions — usually the cheapest reasonable interpretation of what you described — and that number moves once the real spec appears. If you do not have a tech pack, send a physical reference garment and a target price instead; that is a better starting point than a description.

Eight to twelve weeks from first email to sellable stock: a few days to quote, 7–10 days for a sample plus your review and usually one revision, 25–40 days of bulk production after you approve the sample, then 25–35 days of sea freight. Reorders are the payoff — with the spec and tooling already in place they ship in 10–15 days with no new sampling.

Duty, and it is the line item most guides stop short of. For apparel entering the US there is an MFN base rate — around 12% on most knit apparel — plus the current Section 301 rate, which moves too often for anyone to print honestly on a webpage. What matters is whether the factory will write the applicable rate into the quote as its own line, calculated on the day you order, so your landed cost is real. On a first import, DDP (delivered duties paid, to your door) removes customs from your problem entirely. Ask for both.

Where to Go From Here

If you have a reference garment and a rough quantity, you already have enough to get a real quote. It costs nothing, it settles fabric, price tier and timeline in one exchange, and the way a factory answers the questions in this article will tell you more about it than its website will.

We manufacture knitwear and home textiles from our own factory in Suzhou and work with brands from 100 pieces up, which means most people who write to us are placing their first order ever. The categories we run most often are small-batch apparel production, first orders for new brands, hoodies and heavyweight fleece, tees, women’s knitwear and sleepwear and loungewear.

From 100 pcs per colour — sizes mixed freely, no size multiplier
Published FOB pricing — the tables above are what we quote
Duty written into the quote as its own line, or DDP to your door
Sample in 7–10 days, fee credited against your bulk order
NDA before you send files — plus a no-resale clause and pattern ownership in writing
AQL 2.5 — bulk that deviates from your approved sample is remade

⏱️ We reply to every inquiry within 8–12 hours. [email protected] · WhatsApp +86 133 7216 9755

Clothing Tech Pack: What a Factory Actually Needs (Free Template)

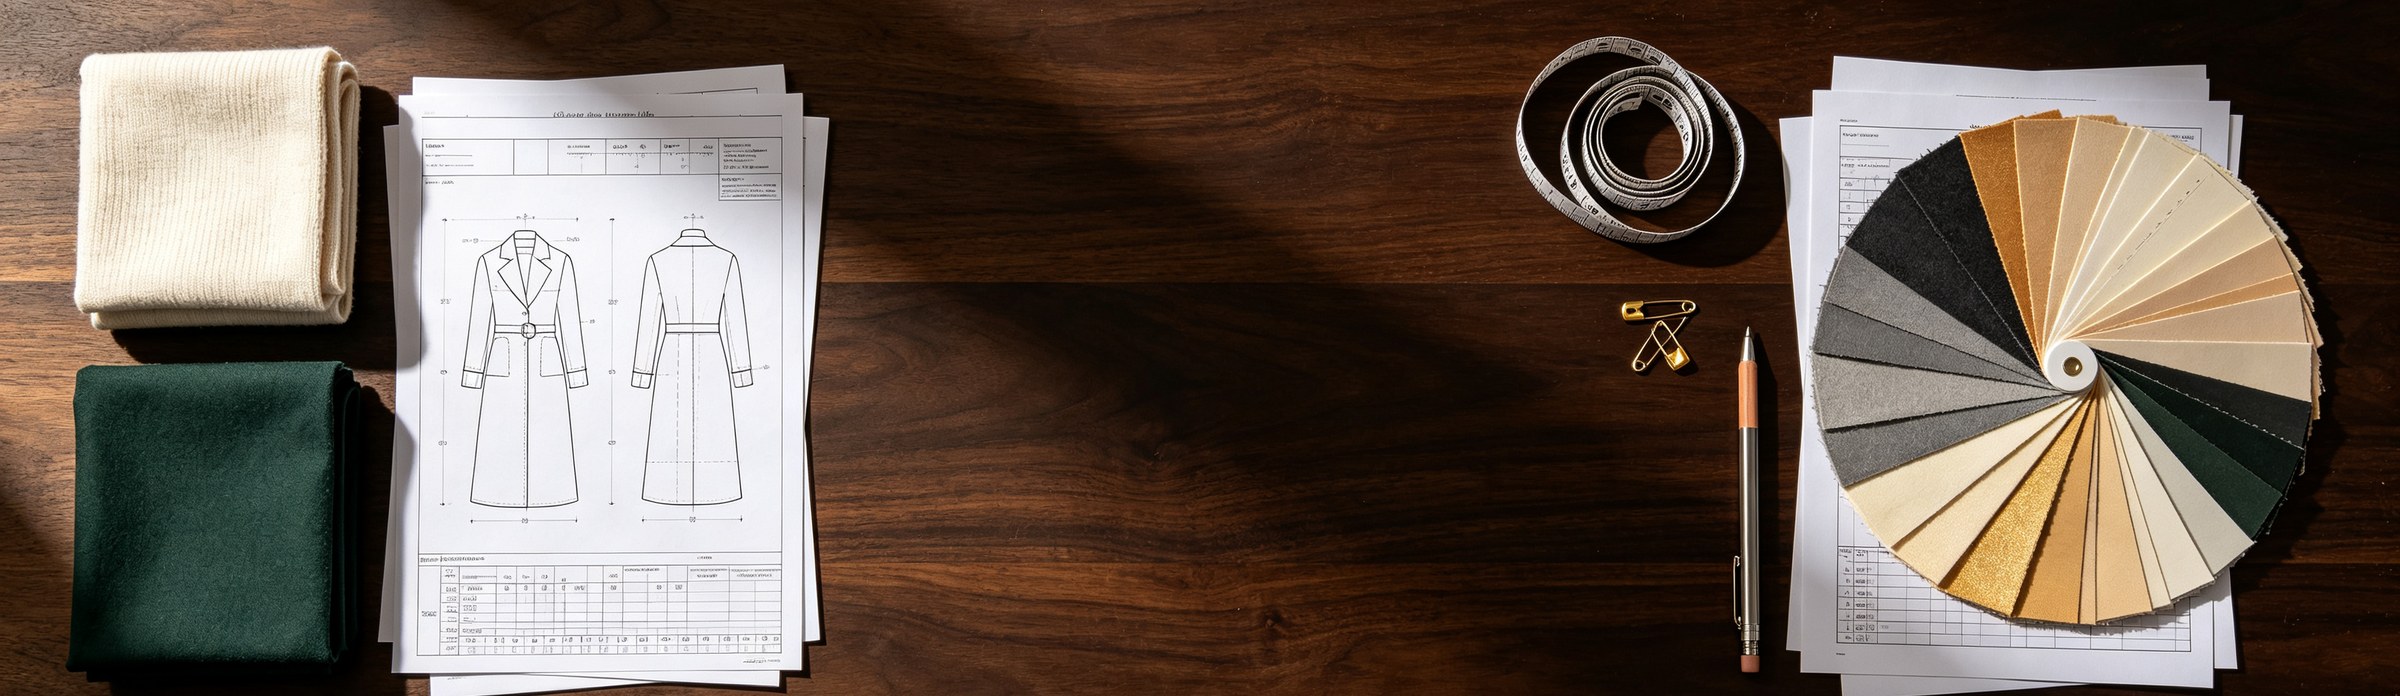
A clothing tech pack is the document that turns a design into instructions a factory can actually cut, sew and inspect from — the flat sketch, the materials, the measurements with tolerances, the construction detail, and the standard the finished goods get checked against. We’re Renrui Textile, a garment factory in Suzhou, China, and this is how work arrives at our door: most weeks at least one tech pack lands that is beautifully designed and still cannot be sewn from — not because the designer did anything wrong, but because it was written for a person, and it is going to be read by a cutting room on the other side of the world.

There is already good material on the internet about what a tech pack is. Almost none of it is written by the people who have to build from one. So this is the other half of the conversation: what a factory actually reads, which fields decide your price, which blank cell quietly hands us a decision that should have been yours — and what gets lost in the gap between your document and a production line that does not share your language, your units, or your assumptions.

There is a free template at the bottom — no email required, no form — and if you fill it in, we will check it free before you commit to a sample. It is the same structure we ask our own clients for.

What a Clothing Tech Pack Actually Is

A tech pack (technical package) is the specification document that turns a design into a manufacturing instruction. It travels with your style through sampling, costing, production and inspection, and it is the reference everyone argues from when something goes wrong.

The definition that matters more, though, is a functional one. A tech pack is the complete set of decisions about your garment. Every decision it does not contain still gets made — it just gets made by someone in the factory, quickly, based on what is normal for them rather than what was in your head.

That is the whole thing in one sentence: a blank field is not an open question. It is a decision you have delegated.

Which is why the most useful way to build a tech pack is not “what does my design look like” but “what could a stranger get wrong”. A factory quoting your style is reading for three things, in this order: can we source this, can we sew this at the rate we quoted, and what will we be measured against when the goods are inspected. Anything that answers those three questions belongs in the document. Anything that does not is decoration.

Why a Factory-Reviewed Template Beats a Template Site

Most tech pack templates online come from software companies or content sites — nobody who actually cuts and sews the garment reads them before you send them to a factory. This one does, because we are the factory. Fill it in, send it back, and we will flag anything a production line would misread — free, before you commit to a sample.

If you used an AI tool to generate your tech pack, send it to us first. We have seen what a factory does with the gaps AI-generated specs tend to leave — an empty tolerance column, adjectives in place of construction terms — and it is not cheap to find that out on a sample run instead of a spreadsheet.

The Eight Sections — and How a Factory Reads Each One

1. Cover sheet

Style name, style number, version number, date, category, size range, quantity, target dates. It looks like admin. It is actually version control, and it is the cheapest insurance in the document.

Here is the failure it prevents. You send a tech pack. Two weeks later you change the sleeve length in an email. Three weeks later you change the fabric weight in a WhatsApp message. The factory now holds three versions of the truth, and the pattern room is working from whichever one got printed. Bump the version number every single time anything changes, and re-send the whole document. A file called final_v2_REAL.xlsx is how the wrong spec gets cut.

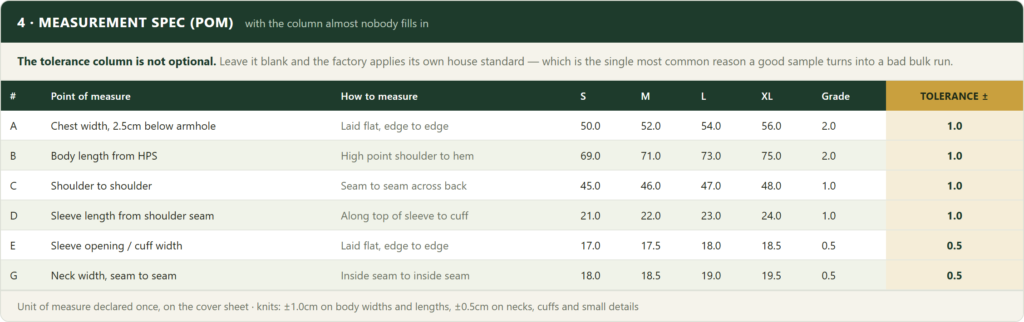
One field on the cover sheet matters more than all the others: the unit of measure. Declare centimetres or inches once, at the top, and never mix them anywhere else in the pack. More on why below.

2. Flat sketch and callouts

Front view, back view, and detail views for anything that is not obvious — collar, cuff, pocket, hem, closure, artwork placement. Not a fashion illustration: a flat, technical, proportional drawing.

The part people skip is numbering. Number every callout on the sketch — 1, 2, 3 — and then use those same numbers in your bill of materials and your construction sheet. That numbering is what lets a pattern maker connect a line on a drawing to a stitch on a machine. Without it, someone in the factory is matching your paragraph of text to your picture by guesswork, and they will do it at speed.

3. Bill of materials (BOM)

Every material in the garment: body fabric, rib, thread, interlining, labels, hangtag, drawcord, zips, polybag.

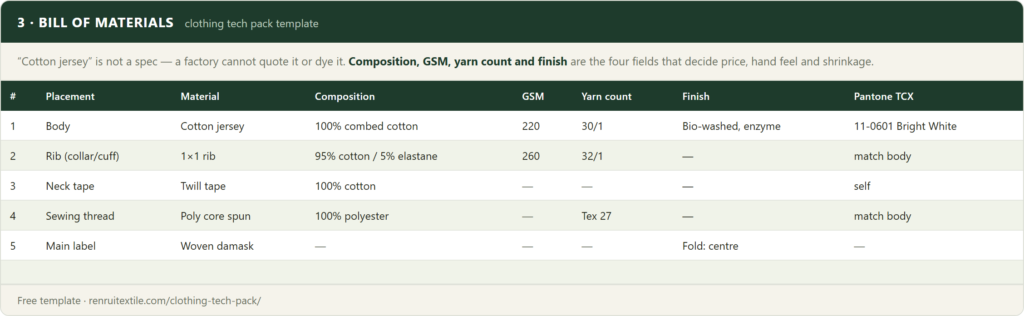
And this is where the single most common quoting problem lives. A BOM that says “cotton jersey” is not a specification. It cannot be quoted, it cannot be dyed, and it cannot be knitted. Four fields turn a fabric name into something a mill can actually book:

  • Composition — 100% combed cotton, or 95/5 cotton-elastane. The 5% changes the machine, the price and the recovery.
  • Weight (GSM) — 180gsm reads as a summer tee, 240gsm reads as a structured piece, 400gsm is a heavyweight hoodie. This is the number that most directly moves your unit cost.
  • Yarn count — 30/1 versus 20/1 is the difference between a fine hand and a coarse one at the same weight.
  • Finish — bio-wash, enzyme, peached, brushed. This is the “feel” you have in your head, and it is a process, not an adjective.

Give a factory those four and you get a real quote in a day. Give it “soft premium cotton” and you get either a long email or, worse, a confident number that quietly assumes the cheapest interpretation.

Bill of materials sheet from a clothing tech pack template, showing composition, GSM, yarn count and finish columns filled in for cotton jersey

4. Measurement spec (POM) — the one with the tolerance column

A points-of-measure sheet lists every dimension of the garment, in every size, with a description of how each one is measured. Chest width 2.5cm below the armhole, laid flat. Body length from HPS (high point shoulder). Sleeve opening, edge to edge.

The description matters as much as the number, because “chest” has at least three plausible meanings and only one of them is yours.

But the column almost nobody fills in — and the reason this section gets its own warning — is tolerance. See below; it is the biggest single point of failure in this document.

5. Construction and stitching

How each seam is joined. Stitch class, seam allowance, stitches per inch, thread, and any reinforcement.

“Clean finish”, “quality stitching” and “nice drape” cannot be sewn. A machine operator does not have a setting for them. What can be sewn: overlock 4-thread, 12 SPI, 1.0cm seam allowance, bartack at the join. If you do not know the stitch names, that is completely fine — send a reference garment and ask the factory to spec it back to you. Any real factory will, and their answer becomes the sheet.

6. Colourways

One row per colour, with Pantone references. Use TCX (the textile cotton library), not TPX or coated chips — those are for print and they will be matched wrong on fabric.

Worth knowing before you plan your colour range: fabric dyed to your colour needs its own dye run, so minimums are counted per colour, not per style. That is why a four-colour range is four times the minimum, not one — and why a first order is almost always cheapest as a single colourway with the full size range inside it. Settle the colour count before you finalise the colourway page; it moves your first order more than any other line in the pack.

7. Labels, trims and packaging

Main label, care label, size label, hangtag, polybag, barcode. Material, size in millimetres, exact placement, and the artwork file.

This is the most-skipped sheet in the entire document, and it is the one that holds a finished order at the door. Fibre content and care symbols are legally required in most markets; the factory prints exactly what you write here and nothing more. Discovering at inspection that your care label is missing a country of origin means re-labelling every unit by hand.

One practical note: woven labels have their own minimum, because the loom has a fixed setup cost — typically 100 per colour. Printed labels go lower. If you are running 100 pieces, that is a real constraint on your first order, and it is better to know it now than after you have designed a woven label.

8. Packing, inspection and sign-off

Folding, pieces per polybag, assortment, carton counts, carton markings — and your inspection standard.

Write the inspection standard into the tech pack, not into an argument after the goods land. Most garment inspection runs on AQL (Acceptable Quality Limit), and the operative word is acceptable: a lot passes with a defined number of defects in it. That is not a loophole, it is how the whole supply chain works — but “passed inspection” does not mean “zero flawed units”, it means the flawed units fell below an agreed threshold.

So agree the threshold. What AQL level, and what counts as a major defect versus a minor one. A loose thread is a minor. A crooked logo is a major. Where that line sits is negotiable, and it belongs in this document, in writing, before production.

What Gets Lost Between Your Tech Pack and an Overseas Factory

Everything above is true for any factory anywhere. This next part is the half that the guides written by design studios do not cover, because they have never had to read a tech pack through a language barrier at eight in the morning with a line waiting.

1. Tolerance — the blank column that decides your bulk run

This is the most expensive empty cell in apparel.

A tolerance is the amount a finished garment is allowed to deviate from your spec and still be correct. Chest width 52cm, tolerance ±1.0cm, means anything from 51 to 53 passes. Fabric relaxes, panels are cut from an 80-layer stack, humidity moves knits — a garment is not a machined part, and some deviation is physics, not negligence.

If you leave the tolerance column blank, the factory applies its own house standard. Not maliciously — it simply has to apply something, and it will apply what is normal for its usual customers. If its usual customers are ordering basic tees at volume, “normal” may be looser than what your fitted style can survive. Then the sample comes back perfect, the bulk comes back drifting, and there is no document that says anyone was wrong.

As a starting point for knits: ±1.0cm on body widths and lengths, ±0.5cm on necks, cuffs and small details. Tighten it where the fit actually depends on it and loosen it where it does not, because tolerance costs money — a tighter tolerance means more rejected panels and slower sewing, and a factory that is quietly holding ±0.3cm across every point of measure is either charging you for it or not doing it.

Clothing tech pack measurement spec (POM) sheet with the tolerance column highlighted, showing plus or minus 1.0cm on body widths and 0.5cm on cuffs and necks

2. Units — and the mixed-unit tech pack

Designers in the US and UK think in inches. Cutting rooms in China work in centimetres. Both of those are fine, and neither causes a problem on its own.

What causes a problem is a tech pack that uses both — inches on the measurement sheet because that is how the designer thinks, millimetres on the label sheet because that is how the label supplier quotes, and a seam allowance in centimetres because it was copied from a reference document. Every conversion is a chance for a rounding error, and rounding errors compound across a graded size range.

Declare one unit on the cover sheet. Use it everywhere. If you are more comfortable in inches, work in inches — a Chinese factory converts inches every day without difficulty. It is the mixing that hurts.

3. Adjectives do not survive translation

“Clean finish.” “Premium feel.” “Nice drape.” “Not too boxy.”

These are perfectly clear to another native speaker who has held the garment you are imagining. They are close to meaningless by the time they reach a production line — and the honest thing to understand is that they get resolved anyway, silently, by whoever is standing at the machine, according to what “clean” usually means in that building.

The fix is not better English. The fix is replacing adjectives with operations. “Clean finish at the hem” becomes “coverstitch, 2-needle, 2.5cm hem allowance, 12 SPI”. “Premium feel” becomes “220gsm, 30/1 combed, bio-washed”. “Not too boxy” becomes a number in the chest and a number at the hem. Every adjective you convert into a specification is a decision you take back.

Tech pack construction sheet specifying stitch type, SPI and seam allowance for each seam instead of adjectives like clean finish

4. The reference garment beats the document

If you own a garment whose fit, weight or hand you want to get close to — send it. Physically. It will teach a factory more in ten minutes than forty pages will.

A pattern maker can measure it, feel the fabric, look at how the seams were built, and reverse-engineer a spec that is closer to what you want than your document was, because the garment does not have to survive translation. Measurements travel badly across languages. A physical garment does not travel at all — it just arrives.

This is the single most useful thing a first-time brand can do, and it is free apart from the courier. Send the reference, and mark clearly what you want to keep from it and what you want to change. “This fit, this weight, but 3cm longer in the body and a heavier rib” is a brief a factory can act on immediately.

5. Nobody wrote down what “wrong” means

The last thing that gets lost is the definition of failure.

Your tech pack says what a correct garment is. It very rarely says what an incorrect one is, and those are not the same document. Without an agreed AQL level, an agreed major/minor split and an agreed tolerance, “this is not what I approved” is an opinion — and an opinion loses to an invoice every time.

The three checkpoints worth writing into the pack, in order of how much they save you:

  • A PP (pre-production) sample made from bulk fabric, on the production line, approved by you in writing. Your development sample was made by the best tailor in the building, by hand, from whatever roll was around. Your bulk is a different process and often a different dye lot. The PP sample is where you find that out — not after 500 pieces are sewn.
  • A golden sample. Two identical copies of the approved sample, signed, dated, sealed. One stays on the factory floor, one stays with you. It converts a future argument from an opinion into a physical fact sitting on the QC table.
  • An inline inspection at roughly 20% sewn. Everyone books a final inspection. Very few small brands book an inline one — and inline is the one that saves you, because a systemic error caught at 20% has happened a hundred times and is fixable, while the same error at final inspection has happened five hundred times and your only options are all bad.
Tech pack packing and inspection sheet defining AQL 2.5, major versus minor defects, inline inspection, PP sample and golden sample
See How We Read a Tech Pack

Before You Send It: Protecting the Design

There is a question underneath this entire article that most people do not ask out loud, so let us ask it directly: you are about to email your complete product design to a factory you have never met, in a country you have never visited. What stops them from simply making it for someone else?

It is a fair fear and it deserves a real answer rather than reassurance. Three things, and all three should be in writing before you attach a single file:

  • An NDA, signed before you send anything. Not after the quote, not with the deposit. Before the files move. A factory that will not sign one before seeing your design has told you something useful for free.
  • A no-resale clause in the production contract. This is the one people forget, and it does more work than the NDA. It states plainly that your design, your patterns and your samples are not resold, not listed in the factory’s own catalogue, and not produced for anyone else. An NDA covers secrecy; the no-resale clause covers what happens after your product exists.
  • Ownership of the patterns and the tech pack. Your patterns are yours. If you leave, they leave with you. A factory that treats the pattern it graded from your tech pack as its own property has quietly locked you in, and you will discover it on the day you try to move.

We put all three in writing, because private label buyers ask us this question more than any other, and “trust us” is not an answer.

What Happens After You Press Send

For context, so the timeline in your head is roughly the timeline in ours. This is how it runs at our factory; other factories will differ, but the shape is fairly standard.

Quoting. A complete tech pack gets quoted quickly, because there is nothing to ask about. An incomplete one turns into a round of questions first, and that round is usually where a week goes.

Sampling. Sample in 7–10 days. The sample fee is credited back against the bulk order when you place it, which is worth knowing when you compare against a factory offering a “free sample” — free samples are made to look good, and paid samples are made to be correct.

Bulk. A first order runs roughly 18–26 days once the sample is approved. A repeat order, where the tooling and the spec already exist and nothing needs re-sampling, ships in 10–15 days.

Minimums. 100 pieces per colour on fabric dyed to your colour, because each colour needs its own dye run. Sizes are mixed freely inside those 100 — XS to XXL in one go, with no size multiplier, which is where a lot of factories quietly add one. Working from certified stock fabric we can run 100 pieces split across several colours, which is usually the only realistic path for a genuine first order.

Quality. Inspection at AQL 2.5, and if bulk deviates from the sample you approved, we remake it. Our materials certificates are public and verifiable rather than a logo on a page — OEKO-TEX® Standard 100 SH025 206558 (issued by TESTEX) and GRS 4.0 TE-00110085 (issued by Intertek); take the numbers and check them in the certifier’s own database, which is what you should do with any factory’s certificates. That is a stronger commitment than a defect rate, and it is the one that matters, because “consistent with the sample” is what you were actually promised.

Landed cost. If you are importing to the US, ask for the duty to be written into the quote as its own line — the 12% MFN base plus whatever the current Section 301 rate is on the day. Any factory that will not put the tariff in writing is leaving you to discover it at customs. Door-to-door DDP, with duty included in a single landed price, is worth asking about on a first import.

Whether you work with us or not, those are the questions. A factory’s answers to them will tell you more than its website will.

Free download · no email required

The Clothing Tech Pack Template

The same eight-sheet structure we ask our own clients for: cover sheet, flat sketch, bill of materials, measurement spec with a tolerance column, construction sheet with stitch-type dropdowns, colourways, labels and packaging, and packing and inspection. Free to use, edit and share. No attribution needed, no form to fill in.

Download the Excel template Download the printable PDF

Want it checked? Send us the filled tech pack and we will review it free of charge, flag anything a factory would read differently from how you meant it, and quote it. We sign an NDA before you send anything.

FAQ: Clothing Tech Packs

A tech pack is the specification document that turns a garment design into a manufacturing instruction. It contains the flat sketch, the bill of materials, the measurement spec with tolerances, the construction and stitching detail, the colourways, the label and packaging detail, and the inspection standard. Functionally, it is the complete set of decisions about your garment — and every decision it leaves out still gets made, just by the factory rather than by you.

Start with the cover sheet and declare one unit of measure. Draw flat front, back and detail views, and number every callout. List every material with composition, GSM, yarn count and finish. Build a measurement sheet with a description of how each point is measured and a tolerance for each one. Write construction as stitch types, seam allowances and SPI rather than adjectives. Then add colourways, labels and packaging, and your inspection standard. You do not need design software — a spreadsheet is genuinely enough, and there is a free template above.

Not to start a conversation, but you need one to get a quote you can rely on. A factory quoting without a tech pack is quoting its own assumptions — usually the cheapest reasonable interpretation of what you described — and that number will move once the real spec appears. If you do not have a tech pack yet, send a reference garment and a target price instead; that is a far better starting point than a description.

A tolerance is how far a finished garment may deviate from your spec and still be correct — for example, chest width 52cm ±1.0cm. It matters because if you leave it blank, the factory applies its own house standard rather than yours. That is the most common reason a sample looks perfect and the bulk run does not. A useful starting point for knits is ±1.0cm on body widths and lengths and ±0.5cm on necks, cuffs and small details.

Yes, and it is often the better first move. A pattern maker can measure a physical garment, feel the fabric and read the construction directly, which is more reliable than a document that has to cross a language barrier. Send the garment, say clearly what you want to keep and what you want to change, and ask the factory to spec it back to you — their spec sheet then becomes the basis of your tech pack.

Freelance tech pack services typically charge somewhere in the low hundreds of dollars per style, and specialist studios charge more. You can also build one yourself in a spreadsheet — for a simple knit style that is entirely realistic, and the template above is designed for exactly that. The cost that actually matters is not the tech pack; it is the extra sampling rounds and the bad bulk run that an incomplete one buys you.

It is the right question to ask, and the answer should be contractual rather than reassuring. Ask for three things in writing before you send any files: an NDA signed before the files move, a no-resale clause in the production contract covering your design, patterns and samples, and confirmation that the patterns and tech pack remain your property so they leave with you if you move factory. A factory that will not put those in writing has answered your question.

No. If you do not know stitch names or construction terms, describe what you want in plain language and send a reference garment if you have one — a real factory will spec it back to you in the terms a production line needs, and that becomes the construction sheet. The template above is built for someone filling it out for the first time, not for a pattern maker.

For a straightforward style, a few hours once you have your measurements and materials decided — most of that time goes into the bill of materials and the tolerance column, not the sketch. A first-timer usually spends longer deciding what to specify than typing it in, which is exactly why the free review exists: send it back and we will tell you what is missing before you find out from a bad sample.

Where to Go From Here

If you have a filled tech pack — or a reference garment and a rough quantity — the fastest next step is a quote conversation. It costs nothing, it settles fabric, price tier and timeline in one exchange, and how a factory answers the questions in this article will tell you more about it than any brochure.

Renrui Textile manufactures knitwear and home textiles from our own factory in Suzhou, and we work with brands from 100 pieces up, which means most of the people who send us a tech pack are sending their first one. If that is you, the categories we run most often are small-batch apparel production, hoodies and heavyweight fleece, women’s knitwear, cut-and-sew streetwear and sleepwear and loungewear.

Free tech pack review — send it, we flag what a factory would read differently
NDA before you send files — plus a no-resale clause and pattern ownership in writing
From 100 pcs per colour — sizes mixed freely inside that 100, no size multiplier
Sample in 7–10 days — sample fee credited against your bulk order
AQL 2.5 — bulk that deviates from your approved sample is remade

⏱️ We reply to every inquiry within 8–12 hours. [email protected] · WhatsApp +86 133 7216 9755

White Label vs In-House Cycling Clothing Production: Which Fits Your Brand?

Almost every cycling brand we talk to opens with the same question, just phrased differently: “Do I put my logo on something that already exists, or do I have you build my kit from scratch?” That is the white-label-versus-in-house decision, and for cycling apparel it carries more weight than it does for a plain tee — because a cycling kit is a technical garment, and the two production models handle “technical” very differently.

As a cycling clothing manufacturer that runs in-house cut-and-sew production, we have an obvious stake in this. But the honest answer is that both models are right — for different brands at different stages. Here is how we explain the trade-off to the cyclists and founders who ask.

What white label actually means for a cycling brand

White label means the garment already exists. A factory has pre-developed a jersey, a bib short, a jacket — pattern graded, fit-tested, sewn, inspected — and sells that same base to many brands. You choose from what is on the shelf, add your logo and sublimation print, pick your labels, and you are in market.

The appeal is speed and low risk. You skip pattern development, fabric trials and sample rounds, so entry cost is lighter and lead time is shorter. For a new club kit, an event one-off, or a founder testing whether anyone will buy the brand at all, that is often exactly the right call. You are buying a known-good product and putting your name on it.

The limit is that the garment is not yours. The fit block, the chamois, the fabric weight, the panel layout — those were decided for everyone, not for your rider. If your differentiator is “a better-fitting bib” or “a specific aero cut,” white label cannot deliver it, because you do not control the thing that would make it true.

What in-house cut-and-sew production gives you

In-house (full OEM cut and sew) means the garment is built to your spec. You bring a tech pack or a reference kit and a fit intent; the factory drafts or adapts the pattern, sources the fabric to your target weight and stretch, sews a proto sample, and you approve the real thing before bulk. Every panel, seam and trim is a decision you get to make.

That control is what costs more — in MOQ, in sample rounds, in lead time. You are paying for development, not just production. The pay-off is a kit that is actually yours: a fit block competitors cannot buy off a shelf, a chamois matched to your ride time, an aero panel layout you specced. Once a brand has proven demand, this is usually where it moves.

Why this choice matters more in cycling than in most apparel

With a cotton tee, white label versus custom is mostly about branding and fit preference. With cycling apparel it is about whether the garment performs, because every piece is doing a technical job:

  • Jerseys have to move heat and sweat out fast while holding shape at speed — that is fabric choice and panel construction, not just a print.
  • Bib shorts live or die on the chamois and the balance of compression versus support. A generic pad under a three-hour ride is where returns come from.
  • Skinsuits are about drag: seam placement and fabric tension either reduce it or they don’t, and a shelf product was not optimised for your rider’s position.
  • Winter kit needs insulation without bulk — a construction problem you can only solve if you control the construction.

This is the real reason the decision is harder for cycling than for casualwear: the parts of the garment that white label freezes are exactly the parts that determine whether a serious cyclist keeps wearing it. So the question is less “which is cheaper” and more “does my brand’s promise live in a part of the garment I need to control?”

White label vs in-house: a side-by-side

 White labelIn-house cut & sew
What you controlLogo, print, labels, packagingFit, fabric, chamois, panels, trims — everything
Speed to marketFast — product already existsSlower — pattern & sampling first
Entry cost & MOQLowerHigher (you pay for development)
Technical fit for cyclingGeneric — decided for everyoneTuned to your rider & use case
Best forClub kits, events, first market testBrands with proven demand & a fit/aero differentiator

How to actually decide

Match the model to your stage, not to what sounds more premium. If you are testing whether the brand sells, or fulfilling a one-off club or event order, start white label — prove demand before you pay for development. If riders already buy from you and your growth depends on a kit that fits or performs better than the shelf option, move to in-house so the differentiator is real.

Plenty of brands run both: white label for quick club and event runs, in-house for the flagship race kit. What matters is being honest about where your brand’s promise actually lives, because that is where choosing a cycling clothing manufacturer with in-house control either pays off or doesn’t. If it lives in a logo, white label is enough. If it lives in the fit, the chamois or the aero, you need to own the build — which is what our activewear manufacturer cut-and-sew program is for, and it sits inside our wider low MOQ clothing manufacturer service from 100 pieces per design.

See Our Activewear Cut-and-Sew Program

FAQ

For a brand still testing demand, white label is usually better: you skip pattern development and sampling, keep MOQ and cost low, and get to market fast on a proven garment. Move to in-house cut-and-sew once demand is proven and your differentiator depends on fit, chamois or aero construction you need to control.

Because cycling garments are technical. The parts white label freezes – fabric behaviour in a jersey, the chamois and compression in bib shorts, seam placement in a skinsuit, insulation in winter kit – are exactly the parts that decide whether a serious cyclist keeps wearing the product. In casualwear those parts barely matter; in cycling they are the product.

Yes, and many brands do. Start white label to validate the market with club kits or event runs, then move your flagship kit to in-house production once you have demand and a clear fit or performance differentiator. Some brands keep running both models in parallel.

Ask three things before you commit. First, do they run production in-house or subcontract it – that decides who is accountable for fit and quality. Second, what is the real MOQ and does it fit your stage. Third, can they handle the technical parts a cycling kit needs: fabric that manages heat and moisture, a chamois matched to ride time, and clean seam construction. A cycling clothing manufacturer that controls its own cut-and-sew line can answer all three without deflecting.

Our cut-and-sew knit MOQ starts at 100 pieces per design, with sample lead time of 7-10 days and bulk production of 25-40 days after approval. Cycling kit that uses woven or bonded technical panels may carry a higher minimum, which we confirm at the quoting stage.

Related Manufacturing Services

Is Bamboo Sleepwear Safe? What the Certifications Actually Test

Search “is bamboo fabric toxic” and you will find Reddit threads full of alarm and very few straight answers. As a factory that produces bamboo sleepwear for brands, we have an obvious interest here — which is exactly why this article separates what is documented from what is marketing, and shows you how to verify every claim yourself, including ours.

The one-sentence answer: the finished bamboo viscose garment you wear is regenerated cellulose and is not toxic; the legitimate concerns are about the manufacturing process and about brands overstating what “bamboo” means. Both concerns have a verification path. Here it is.

What Bamboo Fabric Actually Is (and Why the FTC Cares)

Nearly all “bamboo” sleepwear is bamboo viscose (also labeled rayon from bamboo): bamboo pulp dissolved chemically and regenerated into fiber. It is chemically the same fiber family as any viscose — soft, breathable, drapey. It is not the raw plant woven into cloth, and mechanically-processed “bamboo linen” is rare and rough.

This distinction is regulated. The US FTC requires the fiber to be labeled “rayon from bamboo” or “bamboo viscose” — brands have been fined for labeling products simply “bamboo” and implying the natural stalk’s properties transfer to the fiber. When a label says 95% bamboo viscose / 5% spandex, that is the honest, compliant description. When marketing says “made of pure bamboo,” someone is either careless or hoping you won’t ask.

Where the 'Toxic' Fear Comes From — and Where It Actually Applies

Viscose production uses carbon disulfide as a solvent. Historically, poorly-controlled viscose plants exposed workers to it, and that history is the true core of the toxicity discussion. Two things follow from it:

First: it is a process issue, not a product issue. Carbon disulfide is volatile — it does not ride along in the finished fiber. By the time fabric is spun, dyed, washed and sewn, the question “is there solvent in my pajamas” is answered by lab testing, which is exactly what OEKO-TEX exists to do (next section).

Second: the process concern is real and worth voting on with your wallet. Responsible mills run closed-loop chemical recovery. Buyers who want the strictest version of this choose lyocell-process fibers, where the solvent (NMMO) is captured at 99%+ rates. If a supplier cannot say anything about their fiber source’s process, that silence is information.

What OEKO-TEX Standard 100 Actually Tests

OEKO-TEX STANDARD 100 is a finished-product test, not a marketing badge. A certified fabric has been laboratory-tested against a list of several hundred regulated and suspect substances — formaldehyde, extractable heavy metals, pesticides, chlorinated phenols, banned azo dyes, and residual chemistry among them — with limits stricter for products in Class I (babies) and Class II (direct skin contact, which is where sleepwear sits).

Three things it does not do, so you can weigh it honestly: it does not certify the environmental footprint of fiber production (that is the process issue above), it does not verify recycled content (that is GRS territory), and it does not attach to a brand — it attaches to specific certified material, which is why the certificate number matters more than the logo.

See Our Bamboo Sleepwear Program

How to Verify a Certificate in Two Minutes (Use Ours as Practice)

Any real certificate can be checked at the issuer’s public database — for OEKO-TEX, the Label Check tool on oeko-tex.com; for GRS scope certificates, the Textile Exchange database. Paste the number, confirm the holder name and validity window match the supplier you are talking to. A supplier who sends a blurry logo image instead of a checkable number is failing the cheapest test in sourcing.

Practice on ours: our OEKO-TEX STANDARD 100 certificate SH025 206558 (issued by TESTEX) and our GRS 4.0 scope certificate TE-00110085 (issued by Intertek). Every fabric we quote for a bamboo program ships under valid certification, and we include the documents with every order — a practice any competent bamboo pajama manufacturer should follow as standard, not as a favor.

The Honest Buyer's Checklist for Bamboo Sleepwear

Label wording

“Bamboo viscose” or “rayon from bamboo” = compliant and honest. Just “100% bamboo” on a silky knit = red flag for the whole listing’s credibility.

Certificate number

Ask for the OEKO-TEX number and check it at the issuer’s database. Two minutes, free, and it filters out most pretenders in one step.

Class rating

Sleepwear should test at Class II (direct skin contact) or stricter; baby sleepwear at Class I.

Blend honesty

95/5 bamboo viscose/spandex is a normal, honest sleepwear spec (the spandex is what makes fitted styles recover). A supplier who hides the blend will hide other things.

FAQ: Bamboo Fabric Safety

No. The finished fiber is regenerated cellulose; the solvent used in production (carbon disulfide) is volatile and does not remain in the garment. The documented health concern in viscose history involves factory worker exposure at poorly-controlled plants — a manufacturing ethics issue worth caring about, but not a wearer-safety issue. OEKO-TEX Standard 100 testing on the finished fabric is the direct answer to residue concerns.

US FTC rules require it, because the chemical process transforms the plant into regenerated cellulose — legally and chemically a form of rayon. Brands have paid penalties for implying the raw plant’s antibacterial properties survive into the fiber. Compliant labeling is actually a positive signal about the seller.

Same raw material, different solvent process. Lyocell uses NMMO in a closed loop with 99%+ recovery — the strictest environmental version. Viscose from a responsible mill with chemical recovery sits in the middle; viscose from an unknown mill is the version the criticism fairly applies to. Ask which process your fabric uses; a real factory can answer.

Four items: fiber labeled honestly as bamboo viscose/rayon; an OEKO-TEX Standard 100 certificate number you have verified at the issuer’s database (Class II or stricter); the fiber’s process story (closed-loop or lyocell preferred); and pre-washed fabric before cutting so first-wash shrinkage happens at the factory, not on your customer.

Sourcing Bamboo Sleepwear With the Paper Trail Included

If you are building a bamboo program, work with a pajama manufacturer that treats certification as a document you verify, not a logo you trust. Programs start at 100 pieces per color per style; certified bamboo jersey runs $4.00–$5.50 FOB per set at entry volume.

OEKO-TEX® Standard 100 — SH025 206558 (TESTEX), verify it yourself
GRS 4.0 — TE-00110085 (Intertek)
Low MOQ — from 100 pcs per colour / design
Free fabric swatch pack on request

⏱️ We reply to every inquiry within 8–12 hours.

Request a Quote

How to Start a Pajama Brand: A Factory’s Honest Playbook

We manufacture sleepwear for other people’s brands. Over the past few years we have watched dozens of first-time founders go from a Pinterest board to a shipped product — and we have also watched a few burn their budget before a single set was sewn. This is the playbook we wish every new founder had read first, written from the factory side of the table, with real numbers instead of motivational fluff.

The short version: starting a pajama brand in 2026 realistically takes $2,000–$5,000 and 8–12 weeks from first inquiry to sellable inventory, if you start at a 100-piece test run instead of a container. Here is how that breaks down.

Step 1: Pick a Lane Before You Pick a Fabric

“Pajamas” is not a niche — it is a category with at least four very different businesses inside it. Gifting sets that retail at $45–65 in rigid boxes. Comfort-first knit sets for reorder-driven boutiques. Matching family programs that spike every holiday season. And bamboo sleepwear for buyers who lead with “natural fiber” positioning.

Each lane has different economics. A gifting brand lives or dies on packaging and set color coordination; a comfort brand lives on fabric hand and repeat purchase. From our production floor, roughly 60% of pajama wholesale volume goes to the gifting segment — it is the biggest lane, but also the one with the most specific production requirements.

Decide the lane first. Every downstream choice — fabric, packaging, price point, even which factory you should work with — follows from it.

Step 2: Budget With Real Numbers, Not Guesses

Here is what a 100-piece test run actually costs at a factory like ours, using current FOB pricing:

Samples

One proto sample per style at a flat fee, turned around in 7–10 days. The fee is credited back against your first bulk order above 100 pieces — so on a serious project, sampling is effectively free.

Production

At the 100–199 piece tier, knit sets (jersey, bamboo) run $4.00–$5.50 FOB per set; woven button-down sets run $5.50–$7.00. A 100-piece knit test run is therefore a $400–$550 fabric-and-labor commitment, plus shipping.

Packaging

A printed polybag with a logo header card adds $0.35–$0.60 per unit and works from 100 units. Rigid gift boxes only make economic sense from 200 units (box tooling), at $1.80–$3.20 per unit. Start with the polybag; graduate to the box when reorders justify it.

Timeline

Samples 7–10 days. Bulk production 25–35 days for knit styles, 30–40 for woven, counted from sample approval and deposit. Add shipping and you are looking at 8–12 weeks door to door.

Retail math to sanity-check your lane: most boutique sleepwear retails at 2.2–2.5× the landed wholesale cost. A knit set that lands at $6 all-in supports a $29–$39 retail price; a boxed gifting set landing at $10–$12 supports $45–$65. If your dream price point does not survive this math, change the lane, not the math.

Step 3: Choose a Factory That Will Take a 100-Piece Order Seriously

The single biggest structural problem for new brands is that most factories quote a 300–500 piece minimum per style per color — and the ones that accept less often treat small orders as an afterthought. What you want is a pajama manufacturer whose standard program starts at 100 pieces per color per style, with the same QC protocol as large runs.

Three things to verify before you commit, regardless of who you work with:

1. Sampling happens on the production line. If samples are sewn in a separate sample room by different operators, your bulk order will not match the sample you approved. Ask directly: “Is the proto sewn by the same team that runs bulk?”

2. Set color coordination is treated as a production constraint. A pajama top and bottom cut from different dye lots will read as mismatched under retail lighting — it is the single most common production failure in this category. The fix is procedural: all fabric for a set sourced from one dye lot, confirmed with a dye lot certificate before cutting.

3. Defects have a written remedy. Ask what happens if the delivered batch exceeds the agreed defect tolerance (AQL 2.5 is the industry standard for branded apparel). A factory confident in its QC will put “remake or refund” in writing. One that changes the subject is telling you something.

See Our Pajama Manufacturing Program

Step 4: Run the 100-Piece Test Like a Test

The point of a small first order is not profit — it is information. Structure it so you actually learn something:

Order one style in two colorways rather than two styles in one colorway; color preference data is cheaper to act on than construction changes. Photograph properly before you list — woven sets photograph flat and crisp for catalog imagery, knit sets drape for lifestyle shots, and that difference should drive which lane’s imagery you shoot. Price at your target retail from day one; discounting a test run teaches you nothing about real demand.

When a style sells through, reorder economics improve fast: at the 100–299 tier, knit sets drop to $3.20–$4.40 FOB and custom neck labels and hangtags are included — which is the point where pajamas wholesale pricing starts working as a real margin business rather than a proof of concept.

Step 5: Do Not Skip Compliance (It Is Cheaper Than It Sounds)

Two items matter for sleepwear sold in the US. If you sell children’s sizes 9 months–14 years, CPSC flammability rules (16 CFR 1615/1616) apply — garments comply either by being flame resistant or by being tight-fitting with the required label language. And OEKO-TEX STANDARD 100 certification on the fabric answers the “is this safe against skin” question buyers increasingly ask; it does not add significant cost, but it must be requested at order stage, not discovered at inspection.

Ask your factory which compliance path fits your product before bulk cutting. The conversation costs nothing; retrofitting compliance after production costs the production.

FAQ: Starting a Pajama Brand

Realistically $2,500–$5,500 for a credible test launch: a 100-piece production run ($400–$800 in garments at FOB pricing), sampling, shipping and duties, basic branded packaging, product photography, and a simple storefront. The garment cost is usually the smallest line item — founders consistently underbudget photography and overbudget inventory.

100 pieces per color per style is the practical floor for made-to-order production with custom specs — below that, setup costs make unit economics irrational. Be wary of both extremes: “no minimum” usually means relabeled stock garments, while 500-piece minimums are inventory risk no first-time brand should take.

8–12 weeks is the honest range: about a week of spec discussion, 7–10 days for a proto sample, a revision cycle, 25–40 days of bulk production depending on knit vs woven construction, then freight. Founders who hit 8 weeks are the ones who arrive with a clear reference garment and answer emails quickly.

Knit (jersey, bamboo jersey) is the forgiving choice for a first run: lower unit cost ($4.00–$5.50 vs $5.50–$7.00 FOB at small volume), stretchier fit that tolerates sizing spread, and faster production. Woven button-down sets photograph better for the gifting market but punish sizing mistakes. Most successful first-timers start knit, add woven in round two.

Where to Go From Here

If you have a design reference and a target quantity, the fastest next step is a quote conversation — it costs nothing and typically settles fabric, price tier and timeline in one exchange. Send your style requirements to a low MOQ clothing manufacturer and ask the three verification questions from Step 3. How a factory answers them will tell you more than any brochure.

Low MOQ — from 100 pcs per colour / design
OEKO-TEX® Standard 100 & GRS 4.0 certified materials
Sample turnaround in 7–10 days
Free fabric swatch pack on request

⏱️ We reply to every inquiry within 8–12 hours.

Request a Quote